wxWidgets widgets II
last modified October 18, 2023
In this chapter, we continue introducing various other widgets.
We mention a wxListBox, a wxNotebook, and
a wxScrolledWindow.
wxListBox
A wxListBox widget is used for displaying and working with a list
of items. As its name indicates, it is a rectangle that has a list
of strings inside. We could use it for displaying a list of MP3 files,
book names, module names of a larger project or names of our friends.
A wxListBox can be created in two different states. In a single
selection state or a multiple selection state. The single selection
state is the default state. There are two significant events in
wxListBox. The first one is the wxEVT_COMMAND_LISTBOX_SELECTED event.
This event is generated when we select a string in a wxListBox. The
second one is the wxEVT_COMMAND_LISTBOX_DOUBLE_CLICKED event. It is
generated when we double click an item in a wxListBox. The number of
elements inside a wxListBox is limited on GTK platform. According to
the documentation, it is currently around 2000 elements. The elements
are numbered from zero. Scrollbars are displayed automatically if needed.
#include <wx/wx.h>
#include <wx/listbox.h>

class MyPanel : public wxPanel
{
public:
    MyPanel(wxPanel *parent);

    void OnNew(wxCommandEvent& event);
    void OnRename(wxCommandEvent& event);
    void OnClear(wxCommandEvent& event);
    void OnDelete(wxCommandEvent& event);

    wxListBox *m_lb;

    wxButton *m_newb;
    wxButton *m_renameb;
    wxButton *m_clearb;
    wxButton *m_deleteb;

};

class Listbox : public wxFrame
{
public:
    Listbox(const wxString& title);

    void OnDblClick(wxCommandEvent& event);

    wxListBox *listbox;
    MyPanel *btnPanel;

};

const int ID_RENAME = 1;
const int ID_LISTBOX = 5;
#include "listbox.h"
#include <wx/textdlg.h>


Listbox::Listbox(const wxString& title)
       : wxFrame(NULL, wxID_ANY, title, wxDefaultPosition, wxSize(270, 200))
{

  wxPanel * panel = new wxPanel(this, -1);

  wxBoxSizer *hbox = new wxBoxSizer(wxHORIZONTAL);

  listbox = new wxListBox(panel, ID_LISTBOX,
      wxPoint(-1, -1), wxSize(-1, -1));

  hbox->Add(listbox, 3, wxEXPAND | wxALL, 20);

  btnPanel = new MyPanel(panel);
  hbox->Add(btnPanel, 2, wxEXPAND | wxRIGHT, 10);

  Connect(wxEVT_COMMAND_LISTBOX_DOUBLECLICKED,
      wxCommandEventHandler(Listbox::OnDblClick));

  panel->SetSizer(hbox);
  Center();
}


MyPanel::MyPanel(wxPanel * parent)
       : wxPanel(parent, wxID_ANY)
{
  wxBoxSizer *vbox = new wxBoxSizer(wxVERTICAL);

  Listbox *lb = (Listbox *) parent->GetParent();
  m_lb = lb->listbox;

  m_newb = new wxButton(this, wxID_NEW, wxT("New"));
  m_renameb = new wxButton(this, ID_RENAME, wxT("Rename"));
  m_deleteb = new wxButton(this, wxID_DELETE, wxT("Delete"));
  m_clearb = new wxButton(this, wxID_CLEAR, wxT("Clear"));

  Connect(wxID_NEW, wxEVT_COMMAND_BUTTON_CLICKED,
      wxCommandEventHandler(MyPanel::OnNew) );
  Connect(ID_RENAME, wxEVT_COMMAND_BUTTON_CLICKED,
      wxCommandEventHandler(MyPanel::OnRename) );
  Connect(wxID_CLEAR, wxEVT_COMMAND_BUTTON_CLICKED,
      wxCommandEventHandler(MyPanel::OnClear) );
  Connect(wxID_DELETE, wxEVT_COMMAND_BUTTON_CLICKED,
      wxCommandEventHandler(MyPanel::OnDelete) );

  vbox->Add(-1, 20);
  vbox->Add(m_newb);
  vbox->Add(m_renameb, 0, wxTOP, 5);
  vbox->Add(m_deleteb, 0, wxTOP, 5);
  vbox->Add(m_clearb, 0, wxTOP, 5);

  SetSizer(vbox);
}

void MyPanel::OnNew(wxCommandEvent& event)
{
  wxString str = wxGetTextFromUser(wxT("Add new item"));
  if (str.Len() > 0)
      m_lb->Append(str);
}

void MyPanel::OnClear(wxCommandEvent& event)
{
  m_lb->Clear();
}

void MyPanel::OnRename(wxCommandEvent& event)
{
  wxString text;
  wxString renamed;

  int sel = m_lb->GetSelection();
  if (sel != -1) {
      text = m_lb->GetString(sel);
      renamed = wxGetTextFromUser(wxT("Rename item"),
                  wxT("Rename dialog"), text);
  }

  if (!renamed.IsEmpty()) {
      m_lb->Delete(sel);
      m_lb->Insert(renamed, sel);
  }
}


void MyPanel::OnDelete(wxCommandEvent& event)
{
  int sel = m_lb->GetSelection();
  if (sel != -1) {
      m_lb->Delete(sel);
  }
}

void Listbox::OnDblClick(wxCommandEvent& event)
{
  wxString text;
  wxString renamed;

  int sel = listbox->GetSelection();
  if (sel != -1) {
      text = listbox->GetString(sel);
      renamed = wxGetTextFromUser(wxT("Rename item"),
                  wxT("Rename dialog"), text);
  }

  if (!renamed.IsEmpty()) {
      listbox->Delete(sel);
      listbox->Insert(renamed, sel);
  }
}
#include <wx/wx.h>

class MyApp : public wxApp
{
  public:
    virtual bool OnInit();
};
#include "main.h"
#include "Listbox.h"

IMPLEMENT_APP(MyApp)

bool MyApp::OnInit()
{

    Listbox *listbox = new Listbox(wxT("Listbox"));
    listbox->Show(true);

    return true;
}
listbox = new wxListBox(panel, ID_LISTBOX,
    wxPoint(-1, -1), wxSize(-1, -1));
This is the constructor of the listbox widget.
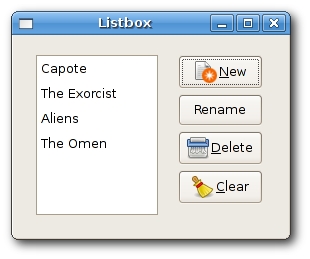
In our example, we have a list box and four buttons. The buttons are used to add, rename, delete and clear all items in the listbox.
wxString str = wxGetTextFromUser(wxT("Add new item"));
if (str.Len() > 0)
    m_lb->Append(str);
To add a new string to the listbox, we display a wxGetTextFromUser
dialog. We call the Append method to
append string to the listbox.
m_lb->Clear();
To clear all items is the easiest action to do. We just call the
Clear method.
int sel = m_lb->GetSelection();
if (sel != -1) {
    m_lb->Delete(sel);
}
To delete an item, we figure out the selected item. Then we call
the Delete method.
Renaming an item requires several steps.
wxString text;
wxString renamed;
We define two local variables.
int sel = listbox->GetSelection();
if (sel != -1) {
    text = listbox->GetString(sel);
    renamed = wxGetTextFromUser(wxT("Rename item"),
                wxT("Rename dialog"), text);
}
We get the selected string and save it to the renamed variable.
if (!renamed.IsEmpty()) {
    m_lb->Delete(sel);
    m_lb->Insert(renamed, sel);
}
We check whether the renamed variable is empty. This is to avoid inserting empty strings. Then we delete the old item and insert a new one.
wxNotebook
The wxNotebook widget joins multiple windows with corresponding tabs.
You can position the Notebook widget using the following style flags:
wxNB_LEFTwxNB_RIGHTwxNB_TOPwxNB_BOTTOM
The default position is wxNB_TOP.
#include <wx/wx.h>
#include <wx/notebook.h>
#include <wx/grid.h>

class Notebook : public wxFrame
{
public:
    Notebook(const wxString& title);

    void OnQuit(wxCommandEvent& event);

};


class MyGrid : public wxGrid
{
public:
    MyGrid(wxNotebook *parent);

};
#include "Notebook.h"

Notebook::Notebook(const wxString& title)
       : wxFrame(NULL, wxID_ANY, title, wxDefaultPosition, wxSize(400, 350))
{

  wxNotebook *nb = new wxNotebook(this, -1, wxPoint(-1, -1),
      wxSize(-1, -1), wxNB_BOTTOM);

  wxMenuBar *menubar = new wxMenuBar;
  wxMenu *file = new wxMenu;
  file->Append(wxID_EXIT, wxT("Quit"), wxT(""));
  menubar->Append(file, wxT("&File"));
  SetMenuBar(menubar);

  Connect(wxEVT_COMMAND_MENU_SELECTED,
      wxCommandEventHandler(Notebook::OnQuit));

  MyGrid *grid1 = new MyGrid(nb);
  MyGrid *grid2 = new MyGrid(nb);
  MyGrid *grid3 = new MyGrid(nb);

  nb->AddPage(grid1, wxT("Sheet1"));
  nb->AddPage(grid2, wxT("Sheet2"));
  nb->AddPage(grid3, wxT("Sheet3"));

  CreateStatusBar();
  Center();
}


void Notebook::OnQuit(wxCommandEvent& event)
{
  Close(true);
}

MyGrid::MyGrid(wxNotebook * parent)
       : wxGrid(parent, wxID_ANY)
{
  CreateGrid(30, 30);
  SetRowLabelSize(50);
  SetColLabelSize(25);
  SetRowLabelAlignment(wxALIGN_RIGHT, wxALIGN_CENTRE);
  SetLabelFont(wxFont(9, wxFONTFAMILY_DEFAULT,
      wxFONTSTYLE_NORMAL, wxFONTWEIGHT_BOLD));

  for (int i = 0; i < 30 ; i++) {
      this->SetRowSize(i, 25);
  }
}
#include <wx/wx.h>

class MyApp : public wxApp
{
  public:
    virtual bool OnInit();
};
#include "main.h"
#include "Notebook.h"

IMPLEMENT_APP(MyApp)

bool MyApp::OnInit()
{

    Notebook *notebook = new Notebook(wxT("Notebook"));
    notebook->Show(true);

    return true;
}
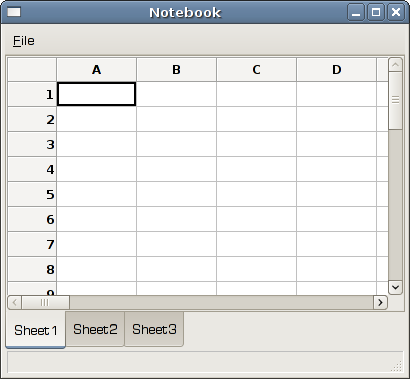
In this example, we have created a notebook widget with three grids. The notebook widget is positioned at the bottom.
wxNotebook *nb = new wxNotebook(this, -1, wxPoint(-1, -1),
    wxSize(-1, -1), wxNB_BOTTOM);
Here we create the notebook widget.
nb->AddPage(grid1, wxT("Sheet1"));
nb->AddPage(grid2, wxT("Sheet2"));
nb->AddPage(grid3, wxT("Sheet3"));
We add three grid objects into the notebook widget.
wxScrolledWindow
This is one of the container widgets. It can be useful, when we have a larger area than a window can display. In our example, we demonstrate such a case. We place a large image into our window. When the window is smaller than our image, Scrollbars are displayed automatically.
#include <wx/wx.h>

class ScrWindow : public wxFrame
{
public:
  ScrWindow(const wxString& title);

};
#include "scrolledwindow.h"

ScrWindow::ScrWindow(const wxString& title)
       : wxFrame(NULL, wxID_ANY, title, wxDefaultPosition, wxSize(300, 200))
{
  wxImage::AddHandler(new wxJPEGHandler);
  wxScrolledWindow *sw = new wxScrolledWindow(this);

  wxBitmap bmp(wxT("castle.jpg"), wxBITMAP_TYPE_JPEG);
  wxStaticBitmap *sb = new wxStaticBitmap(sw, -1, bmp);

  int width = bmp.GetWidth();
  int height = bmp.GetHeight();

  sw->SetScrollbars(10, 10, width/10, height/10);
  sw->Scroll(50,10);

  Center();
}
#include <wx/wx.h>

class MyApp : public wxApp
{
  public:
    virtual bool OnInit();
};
#include "main.h"
#include "scrolledwindow.h"

IMPLEMENT_APP(MyApp)

bool MyApp::OnInit()
{

    ScrWindow *sw = new ScrWindow(wxT("ScrolledWindow"));
    sw->Show(true);

    return true;
}
In our example, we display a picture of a Spis castle.
wxImage::AddHandler(new wxJPEGHandler);
To handle JPG images, we must initiate the wxJPEGHandler.
wxScrolledWindow *sw = new wxScrolledWindow(this);

wxBitmap bmp(wxT("castle.jpg"), wxBITMAP_TYPE_JPEG);
wxStaticBitmap *sb = new wxStaticBitmap(sw, -1, bmp);
We create a scroll window and put a static bitmap into it.
sw->SetScrollbars(10, 10, width/10, height/10);
We set the scrollbars.
sw->Scroll(50,10);
We scroll the window a bit.
In this chapter, we continued covering widgets in wxWidgets library.