GroupLayout layout manager
last modified July 28, 2026
GroupLayout is a flexible built-in Swing layout manager. It is
the only built-in manager capable of creating multi-platform layouts. Other
built-in managers are either too simplistic or use fixed-size gaps that are
not suitable for user interfaces across different platforms
and screen resolutions. In addition to GroupLayout, we
can also use the third-party MigLayout to create multi-platform
layouts in Java.
GroupLayout description
GroupLayout separates components from the actual layout; all
components can be set up in one place and the layout definitions in another.
The GroupLayout manager was originally created to be used by
GUI builders such as NetBeans Matisse. Nevertheless, it can be used to
hand code the layout as well.
GroupLayout works with horizontal and vertical layout
separately. In one step, we define the layout along the horizontal axis;
in the other step, we define the layout along the vertical axis.
There are two types of component arrangements: sequential and parallel.
In a horizontal layout, a row of components is called a sequential group
and a column of components is called a parallel group. In a vertical
layout, a column of components is called a sequential group and a row of
components a parallel group.
Sequential group (horizontal dimension):

    +----------+  +----------+  +----------+
    |  btn1    |  |  btn2    |  |  btn3    |
    +----------+  +----------+  +----------+

    createSequentialGroup()
        .addComponent(btn1)
        .addComponent(btn2)
        .addComponent(btn3)


Parallel group (horizontal dimension):

    +----------+
    |  btn1    |
    +----------+
    |  btn2    |
    +----------+
    |  btn3    |
    +----------+

    createParallelGroup()
        .addComponent(btn1)
        .addComponent(btn2)
        .addComponent(btn3)
In the vertical dimension, the roles are reversed: components placed one below another form a sequential group, while components placed side by side form a parallel group.
In the GroupLayout manager, we can add three kinds of
elements: single components, groups of components, and gaps. Groups are
rows and columns of components. Gaps are spaces between the components.
The gaps can be created manually or automatically by the manager.
There are four alignment constants: LEADING,
TRAILING, CENTER, and BASELINE.
These constants are specified in the
createParallelGroup method. If we do not specify any of
these constants, LEADING is used. In a left-to-right
horizontal layout, LEADING means left and
TRAILING means right. In a vertical top-to-bottom layout,
LEADING means top and TRAILING means bottom.
BASELINE is valid only in the vertical layout; it indicates
that the elements should be aligned along their text baseline.
When we look at a typical GroupLayout example, we can see
chained method calls. This is possible because each method returns the
group on which it is called. Thanks to this, we do not need local
variables to hold every group. The code is typically indented for
better readability.
GroupLayout addComponent method
The addComponent method is the primary way of placing
components into a layout. There are several overloaded versions of
this method. In this section, we describe the most important one:
addComponent(Component comp, int min, int pref, int max)
The three size parameters control how the component behaves when the window is resized. Each parameter can be an absolute pixel value or one of the following constants:
| Constant | Description |
|---|---|
GroupLayout.DEFAULT_SIZE |
Uses the component's own size value from the
corresponding getMinimumSize,
getPreferredSize, or
getMaximumSize method. |
GroupLayout.PREFERRED_SIZE |
Uses the component's preferred size for both the minimum and maximum parameters. This prevents the component from growing beyond its natural size. |
The following table shows common parameter combinations and their effects on a text field:
| Standard | Shrink | Fixed | Explicit | |
|---|---|---|---|---|
| min | DEFAULT_SIZE |
DEFAULT_SIZE |
PREFERRED_SIZE |
100 |
| pref | DEFAULT_SIZE |
DEFAULT_SIZE |
PREFERRED_SIZE |
200 |
| max | DEFAULT_SIZE |
PREFERRED_SIZE |
PREFERRED_SIZE |
300 |
| Effect | Shrinks and grows freely. | Shrinks but cannot grow. For text fields. | Fixed at preferred size. | Explicit range 100–300 px. |
If we omit the size parameters, the default behaviour is equivalent
to passing DEFAULT_SIZE for all three values, allowing
the component to determine its own sizing constraints.
GroupLayout gaps
Gaps are spaces between components. GroupLayout has a
preferred gap, which is a symbolic gap whose actual size is
determined by a LayoutStyle. Preferred gaps automatically
adjust to the look and feel of the application. There are three types
of preferred gaps: RELATED, UNRELATED, and
INDENTED. The difference between related and unrelated gaps
is in size—the distance between unrelated components is a bit
larger. Indented gap represents a preferred horizontal distance
of two components when one is positioned underneath the other with an
indent. The main advantage of these gaps is that they are resolution
independent; i.e. they have a different size in pixels on different
resolution screens. Other built-in managers use fixed-size gaps across
all resolutions.
GroupLayout also distinguishes between component gaps and
container gaps. The latter are gaps between container edges and
neighbouring components. A container gap is inserted with the
addContainerGap method.
The GroupLayout has two methods that create automatic gaps.
The setAutoCreateGaps method creates automatic gaps
between components. The setAutoCreateContainerGaps
creates automatic gaps between components and containers. Automatic gaps
are preferred gaps, so they automatically adjust to the look and feel
of the application.
It may be surprising to see that there are only three predefined gaps.
In LaTeX, a high-quality typesetting system, there are only three
vertical spaces available: \smallskip, \medskip,
and \bigskip. When designing UIs, less is often more and
just because we could use many different gap sizes, font sizes, or
colours, it does not mean we should do it.
GroupLayout simple example
A component is added to the layout manager with the addComponent
method. The parameters are the minimum, preferred, and maximum size values.
We can either pass specific absolute values, or provide the
GroupLayout.DEFAULT_SIZE or the
GroupLayout.PREFERRED_SIZE constants.
The GroupLayout.DEFAULT_SIZE indicates that the corresponding
size from the component should be used (e.g., for the minimum parameter,
the value is determined from the getMinimumSize method).
Similarly, the GroupLayout.PREFERRED_SIZE is determined by
calling the component's getPreferredSize method.
package com.zetcode;

import javax.swing.GroupLayout;
import javax.swing.JFrame;
import javax.swing.JLabel;
import javax.swing.JTextField;
import javax.swing.WindowConstants;
import java.awt.EventQueue;

import static javax.swing.GroupLayout.Alignment.LEADING;
import static javax.swing.LayoutStyle.ComponentPlacement.RELATED;

public class GroupLayoutSimpleEx extends JFrame {

    public GroupLayoutSimpleEx() {

        initUI();
    }

    private void initUI() {

        var pane = getContentPane();
        var gl = new GroupLayout(pane);
        pane.setLayout(gl);

        var lbl = new JLabel("Name:");
        var field = new JTextField(15);

        GroupLayout.SequentialGroup sg = gl.createSequentialGroup();

        sg.addComponent(lbl).addPreferredGap(RELATED).addComponent(field,
                GroupLayout.DEFAULT_SIZE, GroupLayout.DEFAULT_SIZE,
                GroupLayout.PREFERRED_SIZE);

        gl.setHorizontalGroup(sg);

        GroupLayout.ParallelGroup pg = gl.createParallelGroup(
                LEADING, false);

        pg.addComponent(lbl).addComponent(field);
        gl.setVerticalGroup(pg);

        gl.setAutoCreateContainerGaps(true);

        pack();

        setTitle("Simple");
        setLocationRelativeTo(null);
        setDefaultCloseOperation(WindowConstants.EXIT_ON_CLOSE);
    }

    public static void main(String[] args) {

        EventQueue.invokeLater(() -> {
            var ex = new GroupLayoutSimpleEx();
            ex.setVisible(true);
        });
    }
}
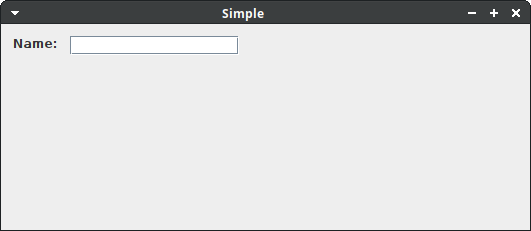
In the example, we have a label and a text field. The text field has fixed width; i.e. we cannot stretch it horizontally.
var pane = getContentPane();
var gl = new GroupLayout(pane);
pane.setLayout(gl);
In Swing, a JFrame is a top-level container composed of several
layered panes. Components are not placed directly onto the frame; instead, they
are placed onto the content pane, which is the middle layer of the
frame's root pane. The getContentPane method returns this content
pane. The content pane's default layout manager is BorderLayout;
we replace it with our own GroupLayout instance.
The GroupLayout constructor takes the container that it will
manage as its argument. Once created, we pass the layout manager to the
content pane's setLayout method. After this, every component
added to the pane is positioned according to the rules defined in the
GroupLayout instance. The variable pane is declared
with var, which infers Container as its type since
getContentPane returns a Container. Similarly,
gl is inferred as GroupLayout.
GroupLayout.SequentialGroup sg = gl.createSequentialGroup();

sg.addComponent(lbl).addPreferredGap(RELATED).addComponent(field,
        GroupLayout.DEFAULT_SIZE, GroupLayout.DEFAULT_SIZE,
        GroupLayout.PREFERRED_SIZE);
Both the addComponent and the addPreferredGap
methods return the group object; therefore, a chain of method calls can
be created. We changed the text field's maximum size to
GroupLayout.PREFERRED_SIZE, thus making it non-expandable
in the horizontal direction beyond its preferred size. (The difference
between the preferred size and the maximum size is the component's tendency
to grow. This applies to managers that honour these values.) Changing the
value back to GroupLayout.DEFAULT_SIZE will cause the text
field to expand in the horizontal dimension.
GroupLayout.ParallelGroup pg = gl.createParallelGroup(
        LEADING, false);
In the vertical layout, the createParallelGroup receives
false for its second parameter (resizable).
This prevents the text field from growing in the vertical direction.
The same effect can be achieved by setting the maximum size parameter
of addComponent to GroupLayout.PREFERRED_SIZE,
which is used in the vertical layout.
gl.setAutoCreateContainerGaps(true);
The setAutoCreateContainerGaps method creates gaps around the
borders of the container.
pack();
The pack method resizes the window to the preferred size of
the contained components.
Independent dimensions
GroupLayout works with horizontal and vertical layout
separately. Each component has to be defined twice in the layout:
once for the horizontal dimension and once for the vertical dimension.
Grid of buttons
We want to have six buttons in the layout. There are two rows; three buttons are put in one row. We need to sketch the layout or create a mental picture in advance and think how we can construct the layout for each dimension.
package com.zetcode;

import javax.swing.GroupLayout;
import javax.swing.JButton;
import javax.swing.JFrame;
import javax.swing.WindowConstants;
import java.awt.EventQueue;

public class GroupLayoutGridEx extends JFrame {

    public GroupLayoutGridEx() {

        initUI();
    }

    private void initUI() {

        var pane = getContentPane();
        var gl = new GroupLayout(pane);
        pane.setLayout(gl);

        gl.setAutoCreateGaps(true);
        gl.setAutoCreateContainerGaps(true);

        var button1 = new JButton("Button1");
        var button2 = new JButton("Button2");
        var button3 = new JButton("Button3");
        var button4 = new JButton("Button4");
        var button5 = new JButton("Button5");
        var button6 = new JButton("Button6");

        gl.setHorizontalGroup(gl.createParallelGroup()
                .addGroup(gl.createSequentialGroup()
                        .addComponent(button1)
                        .addComponent(button2)
                        .addComponent(button3))
                .addGroup(gl.createSequentialGroup()
                        .addComponent(button4)
                        .addComponent(button5)
                        .addComponent(button6))
        );

        gl.setVerticalGroup(gl.createSequentialGroup()
                .addGroup(gl.createParallelGroup()
                        .addComponent(button1)
                        .addComponent(button2)
                        .addComponent(button3))
                .addGroup(gl.createParallelGroup()
                        .addComponent(button4)
                        .addComponent(button5)
                        .addComponent(button6))
        );

        pack();

        setTitle("Grid of buttons");
        setLocationRelativeTo(null);
        setDefaultCloseOperation(WindowConstants.EXIT_ON_CLOSE);
    }

    public static void main(String[] args) {

        EventQueue.invokeLater(() -> {

            var ex = new GroupLayoutGridEx();
            ex.setVisible(true);
        });
    }
}
The example creates a grid of six buttons. The buttons have numbers so that we can see how they are placed.
gl.setHorizontalGroup(gl.createParallelGroup()
        .addGroup(gl.createSequentialGroup()
                .addComponent(button1)
                .addComponent(button2)
                .addComponent(button3))
        .addGroup(gl.createSequentialGroup()
                .addComponent(button4)
                .addComponent(button5)
                .addComponent(button6))
);
These lines create the horizontal layout: one parallel group of two sequential groups of three buttons. From the perspective of the horizontal dimension, there is one column of two rows of buttons.
gl.setVerticalGroup(gl.createSequentialGroup()
        .addGroup(gl.createParallelGroup()
                .addComponent(button1)
                .addComponent(button2)
                .addComponent(button3))
        .addGroup(gl.createParallelGroup()
                .addComponent(button4)
                .addComponent(button5)
                .addComponent(button6))
);
The second layout is the vertical layout. Here we create one sequential group of two parallel groups of three buttons. From the perspective of the vertical dimension, parallel groups are rows of buttons placed within one column.
Nested group hierarchy for the 6-button grid:
setHorizontalGroup
└── ParallelGroup
    ├── SequentialGroup  (row 1)
    │   ├── button1
    │   ├── button2
    │   └── button3
    └── SequentialGroup  (row 2)
        ├── button4
        ├── button5
        └── button6


setVerticalGroup
└── SequentialGroup
    ├── ParallelGroup  (column of row 1)
    │   ├── button1
    │   ├── button2
    │   └── button3
    └── ParallelGroup  (column of row 2)
        ├── button4
        ├── button5
        └── button6
The indented tree structure mirrors the chained method calls in the source code. Each nesting level corresponds to one method call in the chain.
Grid of buttons: alternative approach
This is not the only possible way of creating this layout. For example, in a horizontal layout, instead of one parallel group of two sequential groups of three buttons, we could create one sequential group of three parallel groups of two buttons. The following example is an alternative solution.
package com.zetcode;

import javax.swing.GroupLayout;
import javax.swing.JButton;
import javax.swing.JFrame;
import javax.swing.WindowConstants;

import java.awt.EventQueue;

public class GroupLayoutGridEx2 extends JFrame {

    public GroupLayoutGridEx2() {

        initUI();
    }

    private void initUI() {

        var pane = getContentPane();
        var gl = new GroupLayout(pane);
        pane.setLayout(gl);

        gl.setAutoCreateGaps(true);
        gl.setAutoCreateContainerGaps(true);

        var button1 = new JButton("Button1");
        var button2 = new JButton("Button2");
        var button3 = new JButton("Button3");
        var button4 = new JButton("Button4");
        var button5 = new JButton("Button5");
        var button6 = new JButton("Button6");

        gl.setHorizontalGroup(gl.createSequentialGroup()
                .addGroup(gl.createParallelGroup()
                        .addComponent(button1)
                        .addComponent(button4))
                .addGroup(gl.createParallelGroup()
                        .addComponent(button2)
                        .addComponent(button5))
                .addGroup(gl.createParallelGroup()
                        .addComponent(button3)
                        .addComponent(button6)));

        gl.setVerticalGroup(gl.createParallelGroup()
                .addGroup(gl.createSequentialGroup()
                        .addComponent(button1)
                        .addComponent(button4))
                .addGroup(gl.createSequentialGroup()
                        .addComponent(button2)
                        .addComponent(button5))
                .addGroup(gl.createSequentialGroup()
                        .addComponent(button3)
                        .addComponent(button6)));

        pack();

        setTitle("Grid of buttons");
        setLocationRelativeTo(null);
        setDefaultCloseOperation(WindowConstants.EXIT_ON_CLOSE);
    }

    public static void main(String[] args) {

        EventQueue.invokeLater(() -> {

            var ex = new GroupLayoutGridEx2();
            ex.setVisible(true);
        });
    }
}
There might be more solutions to a specific layout. In our case, both solutions are technically equivalent.
gl.setHorizontalGroup(gl.createSequentialGroup()
        .addGroup(gl.createParallelGroup()
                .addComponent(button1)
                .addComponent(button4))
        .addGroup(gl.createParallelGroup()
                .addComponent(button2)
                .addComponent(button5))
        .addGroup(gl.createParallelGroup()
                .addComponent(button3)
                .addComponent(button6))
);
This horizontal layout creates a sequential group of three parallel groups of two buttons—a row of three columns of buttons.
gl.setVerticalGroup(gl.createParallelGroup()
        .addGroup(gl.createSequentialGroup()
                .addComponent(button1)
                .addComponent(button4))
        .addGroup(gl.createSequentialGroup()
                .addComponent(button2)
                .addComponent(button5))
        .addGroup(gl.createSequentialGroup()
                .addComponent(button3)
                .addComponent(button6))
);
For the vertical layout we create one parallel group of three sequential groups of two buttons—a column of three rows of buttons.
Gap examples
The GroupLayout manager provides several ways to control
spacing between components. We can use fixed gaps with explicit pixel
sizes, automatic gaps that are computed by the manager based on the
platform's look and feel, or resizable gaps that expand and shrink with
the window.
Fixed gaps
The following example creates fixed gaps between components.
package com.zetcode;

import javax.swing.GroupLayout;
import javax.swing.JButton;
import javax.swing.JFrame;
import javax.swing.WindowConstants;
import java.awt.EventQueue;

import static javax.swing.LayoutStyle.ComponentPlacement.RELATED;

public class GroupLayoutFixedGapsEx extends JFrame {

    public GroupLayoutFixedGapsEx() {

        initUI();
    }

    private void initUI() {

        var cpane = getContentPane();
        var gl = new GroupLayout(cpane);
        cpane.setLayout(gl);

        var button1 = new JButton("Button");
        var button2 = new JButton("Button");
        var button3 = new JButton("Button");

        gl.setHorizontalGroup(gl.createSequentialGroup()
                .addContainerGap()
                .addGroup(gl.createParallelGroup()
                        .addGroup(gl.createSequentialGroup()
                                .addComponent(button1)
                                .addPreferredGap(RELATED)
                                .addComponent(button2)
                                .addPreferredGap(RELATED)
                                .addComponent(button3)))
                .addContainerGap()
        );

        gl.setVerticalGroup(gl.createSequentialGroup()
                .addContainerGap()
                .addGroup(gl.createParallelGroup()
                        .addComponent(button1)
                        .addComponent(button2)
                        .addComponent(button3))
                .addContainerGap()
        );

        pack();

        setTitle("Fixed gaps");
        setLocationRelativeTo(null);
        setDefaultCloseOperation(WindowConstants.EXIT_ON_CLOSE);
    }

    public static void main(String[] args) {

        EventQueue.invokeLater(() -> {

            var ex = new GroupLayoutFixedGapsEx();
            ex.setVisible(true);
        });
    }
}
There are three buttons in the layout. We create gaps between the buttons and between buttons and container edges.
gl.setHorizontalGroup(gl.createSequentialGroup()
        .addContainerGap()
        .addGroup(gl.createParallelGroup()
                .addGroup(gl.createSequentialGroup()
                        .addComponent(button1)
                        .addPreferredGap(RELATED)
                        .addComponent(button2)
                        .addPreferredGap(RELATED)
                        .addComponent(button3)))
        .addContainerGap()
);
The addContainerGap methods create container gaps at the
beginning and at the end of the row. They create preferred, fixed gaps.
The addPreferredGap is used to insert a preferred, fixed
gap between buttons.
Automatic gaps
In the next example, the gaps are automatically created for us.
package com.zetcode;

import javax.swing.GroupLayout;
import javax.swing.JButton;
import javax.swing.JFrame;
import javax.swing.WindowConstants;

import java.awt.EventQueue;

public class GroupLayoutAutomaticGapsEx extends JFrame {

    public GroupLayoutAutomaticGapsEx() {

        initUI();
    }

    private void initUI() {

        var cpane = getContentPane();
        var gl = new GroupLayout(cpane);
        cpane.setLayout(gl);

        gl.setAutoCreateGaps(true);
        gl.setAutoCreateContainerGaps(true);

        var button1 = new JButton("Button");
        var button2 = new JButton("Button");
        var button3 = new JButton("Button");

        gl.setHorizontalGroup(gl.createSequentialGroup()
                .addGroup(gl.createParallelGroup()
                        .addGroup(gl.createSequentialGroup()
                                .addComponent(button1)
                                .addComponent(button2)
                                .addComponent(button3))));

        gl.setVerticalGroup(gl.createSequentialGroup()
                .addGroup(gl.createParallelGroup()
                        .addComponent(button1)
                        .addComponent(button2)
                        .addComponent(button3)));

        pack();

        setTitle("Automatic gaps");
        setLocationRelativeTo(null);
        setDefaultCloseOperation(WindowConstants.EXIT_ON_CLOSE);
    }

    public static void main(String[] args) {

        EventQueue.invokeLater(() -> {

            var ex = new GroupLayoutAutomaticGapsEx();
            ex.setVisible(true);
        });
    }
}
Automatic gaps are preferred, fixed gaps. The buttons remain in the initial positions when the window is resized.
gl.setAutoCreateGaps(true);
gl.setAutoCreateContainerGaps(true);
Passing true to these two methods generates automatic gaps.
If we are not satisfied with the outcome, we can modify it with our
own gaps.
Resizable gaps
In the last example of this section, we create resizable gaps.
package com.zetcode;

import javax.swing.GroupLayout;
import javax.swing.JButton;
import javax.swing.JFrame;
import javax.swing.WindowConstants;

import java.awt.EventQueue;

import static javax.swing.GroupLayout.DEFAULT_SIZE;
import static javax.swing.LayoutStyle.ComponentPlacement.RELATED;

public class GroupLayoutResizableGapsEx extends JFrame {

    public GroupLayoutResizableGapsEx() {

        initUI();
    }

    private void initUI() {

        var cpane = getContentPane();
        var gl = new GroupLayout(cpane);
        cpane.setLayout(gl);

        var button1 = new JButton("Button");
        var button2 = new JButton("Button");
        var button3 = new JButton("Button");

        gl.setHorizontalGroup(gl.createSequentialGroup()
                .addContainerGap(DEFAULT_SIZE, Integer.MAX_VALUE)
                .addGroup(gl.createParallelGroup()
                        .addGroup(gl.createSequentialGroup()
                                .addComponent(button1)
                                .addPreferredGap(RELATED, GroupLayout.DEFAULT_SIZE,
                                        Short.MAX_VALUE)
                                .addComponent(button2)
                                .addPreferredGap(RELATED, GroupLayout.DEFAULT_SIZE,
                                        Short.MAX_VALUE)
                                .addComponent(button3)))
                .addContainerGap(DEFAULT_SIZE, Integer.MAX_VALUE));

        gl.setVerticalGroup(gl.createSequentialGroup()
                .addContainerGap(DEFAULT_SIZE, Integer.MAX_VALUE)
                .addGroup(gl.createParallelGroup()
                        .addComponent(button1)
                        .addComponent(button2)
                        .addComponent(button3))
                .addContainerGap(DEFAULT_SIZE, Integer.MAX_VALUE));

        pack();

        setTitle("Resizable gaps");
        setLocationRelativeTo(null);
        setDefaultCloseOperation(WindowConstants.EXIT_ON_CLOSE);
    }

    public static void main(String[] args) {

        EventQueue.invokeLater(() -> {

            var ex = new GroupLayoutResizableGapsEx();
            ex.setVisible(true);
        });
    }
}
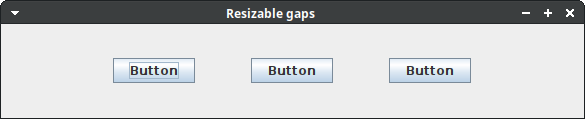
At the beginning and at the end of each dimension, we create resizable container gaps. This centres the components in the layout. Resizable gaps are also placed between button components.
gl.setHorizontalGroup(gl.createSequentialGroup()
        .addContainerGap(DEFAULT_SIZE, Integer.MAX_VALUE)
        .addGroup(gl.createParallelGroup()
                .addGroup(gl.createSequentialGroup()
                        .addComponent(button1)
                        .addPreferredGap(RELATED,
                                GroupLayout.DEFAULT_SIZE,
                                Short.MAX_VALUE)
                        .addComponent(button2)
                        .addPreferredGap(RELATED,
                                GroupLayout.DEFAULT_SIZE,
                                Short.MAX_VALUE)
                        .addComponent(button3)))
        .addContainerGap(DEFAULT_SIZE, Integer.MAX_VALUE)
);
The container gaps at both ends and the preferred gaps between buttons
expand proportionally. Their maximum size is set to
Short.MAX_VALUE or Integer.MAX_VALUE, which
allows them to grow as the window expands.
The difference between the container gap's default size and
Integer.MAX_VALUE is its ability to grow. Putting a
resizable gap at both ends centers the components horizontally.
When the window is resized, all extra space is distributed equally
before and after the components.
Resizable gaps before and after window resize:
Before:
|[--gap--]  [btn1]  [--gap--]  [btn2]  [--gap--]  [btn3]  [--gap--]|

After window grows:
|[----gap----]  [btn1]  [----gap----]  [btn2]  [----gap----]  [btn3]  [----gap----]|
Indent
In addition to related and unrelated gaps, we have indented gaps in
GroupLayout. Indented gaps are horizontal distances of two
components where one of them is positioned underneath the other with an
indent.
package com.zetcode;

import javax.swing.GroupLayout;
import javax.swing.JComponent;
import javax.swing.JFrame;
import javax.swing.JLabel;
import javax.swing.JTextField;
import javax.swing.LayoutStyle;
import javax.swing.WindowConstants;
import javax.swing.border.EmptyBorder;
import java.awt.EventQueue;

import static javax.swing.GroupLayout.Alignment.BASELINE;

public class GroupLayoutIndentEx extends JFrame {

    public GroupLayoutIndentEx() {

        initUI();
    }

    private void initUI() {

        var pane = (JComponent) getContentPane();
        pane.setBorder(new EmptyBorder(15, 15, 85, 85));

        var gl = new GroupLayout(pane);
        pane.setLayout(gl);

        var ampLbl = new JLabel("Amplitude");
        var offLbl = new JLabel("Off-set");
        var freqLbl = new JLabel("Frequency");
        var phsLbl = new JLabel("Phase");
        var unit1 = new JLabel("V");
        var unit2 = new JLabel("V");
        var unit3 = new JLabel("Hz");
        var unit4 = new JLabel("rad");

        var field1 = new JTextField(12);
        var field2 = new JTextField(12);
        var field3 = new JTextField(12);
        var field4 = new JTextField(12);

        gl.setAutoCreateGaps(true);
        gl.setAutoCreateContainerGaps(true);

        gl.setHorizontalGroup(gl.createParallelGroup()
                .addComponent(ampLbl)
                .addGroup(gl.createSequentialGroup()
                        .addPreferredGap(ampLbl, field1,
                                LayoutStyle.ComponentPlacement.INDENT)
                        .addComponent(field1)
                        .addComponent(unit1))
                .addComponent(offLbl)
                .addGroup(gl.createSequentialGroup()
                        .addPreferredGap(offLbl, field2,
                                LayoutStyle.ComponentPlacement.INDENT)
                        .addComponent(field2)
                        .addComponent(unit2))
                .addComponent(freqLbl)
                .addGroup(gl.createSequentialGroup()
                        .addPreferredGap(freqLbl, field3,
                                LayoutStyle.ComponentPlacement.INDENT)
                        .addComponent(field3)
                        .addComponent(unit3))
                .addComponent(phsLbl)
                .addGroup(gl.createSequentialGroup()
                        .addPreferredGap(phsLbl, field4,
                                LayoutStyle.ComponentPlacement.INDENT)
                        .addComponent(field4)
                        .addComponent(unit4)));

        gl.setVerticalGroup(gl.createSequentialGroup()
                        .addComponent(ampLbl)
                        .addGroup(gl.createParallelGroup(BASELINE)
                                .addComponent(field1)
                                .addComponent(unit1))
                        .addComponent(offLbl)
                        .addGroup(gl.createParallelGroup(BASELINE)
                                .addComponent(field2)
                                .addComponent(unit2))
                        .addComponent(freqLbl)
                        .addGroup(gl.createParallelGroup(BASELINE)
                                .addComponent(field3)
                                .addComponent(unit3))
                        .addComponent(phsLbl)
                        .addGroup(gl.createParallelGroup(BASELINE)
                                .addComponent(field4)
                                .addComponent(unit4)));

        gl.linkSize(field1, field2, field3, field4);

        pack();

        setTitle("Indents");
        setLocationRelativeTo(null);
        setDefaultCloseOperation(WindowConstants.EXIT_ON_CLOSE);
    }

    public static void main(String[] args) {

        EventQueue.invokeLater(() -> {

            var ex = new GroupLayoutIndentEx();
            ex.setVisible(true);
        });
    }
}
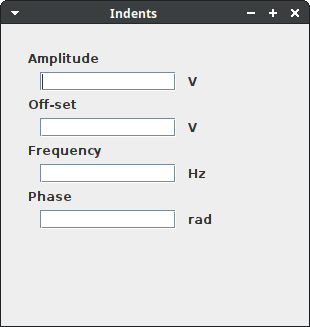
In the example, we have indented text fields below the label components.
var pane = (JComponent) getContentPane();
pane.setBorder(new EmptyBorder(15, 15, 85, 85));
We set some borders for the content pane.
gl.setHorizontalGroup(gl.createParallelGroup()
        .addComponent(ampLbl)
        .addGroup(gl.createSequentialGroup()
                .addPreferredGap(ampLbl, field1,
                        LayoutStyle.ComponentPlacement.INDENT)
                .addComponent(field1)
                .addComponent(unit1))
        ...
Indented gaps are created in the horizontal layout within a sequential
group. We use the
LayoutStyle.ComponentPlacement.INDENT component placement
type.
Alignments
The GroupLayout manager has the following alignment
constants: LEADING, CENTER,
TRAILING, and BASELINE. These constants are
passed to the createParallelGroup method.
Horizontal alignment
In the following example we align buttons horizontally; horizontal alignment is defined in the horizontal layout.
package com.zetcode;

import javax.swing.GroupLayout;
import javax.swing.JButton;
import javax.swing.JComponent;
import javax.swing.JFrame;
import javax.swing.JLabel;
import javax.swing.UIManager;
import javax.swing.WindowConstants;
import javax.swing.border.EmptyBorder;
import java.awt.EventQueue;
import java.awt.Font;

import static javax.swing.GroupLayout.Alignment.CENTER;
import static javax.swing.GroupLayout.Alignment.LEADING;
import static javax.swing.GroupLayout.Alignment.TRAILING;

public class GroupLayoutHorAlignEx extends JFrame {

    public GroupLayoutHorAlignEx() {

        initUI();
    }

    private void initUI() {

        var pane = (JComponent) getContentPane();
        pane.setBorder(new EmptyBorder(20, 20, 20, 20));

        var gl = new GroupLayout(pane);
        pane.setLayout(gl);

        gl.setAutoCreateGaps(true);
        gl.setAutoCreateContainerGaps(true);

        var largeFont = new Font(Font.SANS_SERIF, Font.PLAIN, 18);
        UIManager.put("Button.font", largeFont);
        UIManager.put("Label.font", largeFont);

        var leftLbl = new JLabel("[Left]");
        var button1 = new JButton("--");
        var button2 = new JButton("----");
        var button3 = new JButton("--------");
        var button4 = new JButton("----");
        var button5 = new JButton("--");

        var centLbl = new JLabel("[Center]");
        var button6 = new JButton("--");
        var button7 = new JButton("----");
        var button8 = new JButton("--------");
        var button9 = new JButton("----");
        var button10 = new JButton("--");

        var rightLbl = new JLabel("[Right]");
        var button11 = new JButton("--");
        var button12 = new JButton("----");
        var button13 = new JButton("--------");
        var button14 = new JButton("----");
        var button15 = new JButton("--");

        gl.setHorizontalGroup(gl.createSequentialGroup()
                .addGroup(gl.createParallelGroup(LEADING)
                        .addComponent(leftLbl)
                        .addComponent(button1)
                        .addComponent(button2)
                        .addComponent(button3)
                        .addComponent(button4)
                        .addComponent(button5))
                .addGroup(gl.createParallelGroup(CENTER)
                        .addComponent(centLbl)
                        .addComponent(button6)
                        .addComponent(button7)
                        .addComponent(button8)
                        .addComponent(button9)
                        .addComponent(button10))
                .addGroup(gl.createParallelGroup(TRAILING)
                        .addComponent(rightLbl)
                        .addComponent(button11)
                        .addComponent(button12)
                        .addComponent(button13)
                        .addComponent(button14)
                        .addComponent(button15)));

        gl.setVerticalGroup(gl.createSequentialGroup()
                .addGroup(gl.createParallelGroup()
                        .addComponent(leftLbl)
                        .addComponent(centLbl)
                        .addComponent(rightLbl))
                .addGroup(gl.createParallelGroup()
                        .addComponent(button1)
                        .addComponent(button6)
                        .addComponent(button11))
                .addGroup(gl.createParallelGroup()
                        .addComponent(button2)
                        .addComponent(button7)
                        .addComponent(button12))
                .addGroup(gl.createParallelGroup()
                        .addComponent(button3)
                        .addComponent(button8)
                        .addComponent(button13))
                .addGroup(gl.createParallelGroup()
                        .addComponent(button4)
                        .addComponent(button9)
                        .addComponent(button14))
                .addGroup(gl.createParallelGroup()
                        .addComponent(button5)
                        .addComponent(button10)
                        .addComponent(button15)));

        pack();

        setTitle("Horizontal alignment");
        setLocationRelativeTo(null);
        setDefaultCloseOperation(WindowConstants.EXIT_ON_CLOSE);
    }

    public static void main(String[] args) {

        EventQueue.invokeLater(() -> {

            var ex = new GroupLayoutHorAlignEx();
            ex.setVisible(true);
        });
    }
}
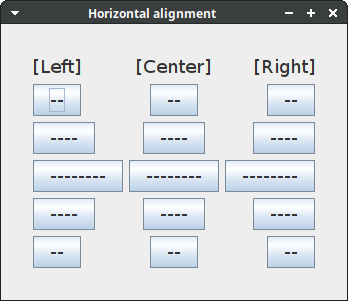
We have three groups of buttons. They are horizontally aligned to the left, centre, and right.
var largeFont = new Font(Font.SANS_SERIF, Font.PLAIN, 18);
UIManager.put("Button.font", largeFont);
UIManager.put("Label.font", largeFont);
We set the font size of the buttons and labels to a larger size.
gl.setHorizontalGroup(gl.createSequentialGroup()
        .addGroup(gl.createParallelGroup(LEADING)
                .addComponent(leftLbl)
                .addComponent(button1)
                .addComponent(button2)
                .addComponent(button3)
                .addComponent(button4)
                .addComponent(button5))
        .addGroup(gl.createParallelGroup(CENTER)
                .addComponent(centLbl)
                .addComponent(button6)
                .addComponent(button7)
                .addComponent(button8)
                .addComponent(button9)
                .addComponent(button10))
        .addGroup(gl.createParallelGroup(TRAILING)
                .addComponent(rightLbl)
                .addComponent(button11)
                .addComponent(button12)
                .addComponent(button13)
                .addComponent(button14)
                .addComponent(button15))
);
In the horizontal direction, the layout consists of one sequential
group of three parallel groups of components. The LEADING
alignment in the horizontal direction aligns the components to the left.
The components in the second group are aligned to the centre.
The TRAILING constant aligns the third group to the right.
Vertical alignment
The next example aligns components vertically. Components can be aligned vertically in the vertical layout.
package com.zetcode;

import javax.swing.GroupLayout;
import javax.swing.JButton;
import javax.swing.JComponent;
import javax.swing.JFrame;
import javax.swing.JLabel;
import javax.swing.UIManager;
import javax.swing.WindowConstants;
import javax.swing.border.EmptyBorder;

import java.awt.EventQueue;
import java.awt.Font;

import static javax.swing.GroupLayout.Alignment.CENTER;
import static javax.swing.GroupLayout.Alignment.LEADING;
import static javax.swing.GroupLayout.Alignment.TRAILING;

public class GroupLayoutVertAlignEx extends JFrame {

    public GroupLayoutVertAlignEx() {

        initUI();
    }

    private void initUI() {

        var pane = (JComponent) getContentPane();
        pane.setBorder(new EmptyBorder(20, 20, 20, 20));

        var gl = new GroupLayout(pane);
        pane.setLayout(gl);

        gl.setAutoCreateGaps(true);
        gl.setAutoCreateContainerGaps(true);

        var largeFont = new Font(Font.SANS_SERIF, Font.PLAIN, 18);
        UIManager.put("Button.font", largeFont);
        UIManager.put("Label.font", largeFont);

        var leftLbl = new JLabel("[Top]");
        var button1 = new JButton("1");
        var button2 = new JButton("<html>1<br>2</html>");
        var button3 = new JButton("<html>1<br>2<br>3</html>");

        var centLbl = new JLabel("[Center]");
        var button4 = new JButton("1");
        var button5 = new JButton("<html>1<br>2</html>");
        var button6 = new JButton("<html>1<br>2<br>3</html>");

        var rightLbl = new JLabel("[Bottom]");
        var button7 = new JButton("1");
        var button8 = new JButton("<html>1<br>2</html>");
        var button9 = new JButton("<html>1<br>2<br>3</html>");

        gl.setHorizontalGroup(gl.createSequentialGroup()
                .addGroup(gl.createParallelGroup()
                        .addComponent(leftLbl)
                        .addComponent(centLbl)
                        .addComponent(rightLbl))
                .addGroup(gl.createParallelGroup()
                        .addComponent(button1)
                        .addComponent(button4)
                        .addComponent(button7))
                .addGroup(gl.createParallelGroup(LEADING, false)
                        .addComponent(button2)
                        .addComponent(button5)
                        .addComponent(button8))
                .addGroup(gl.createParallelGroup(LEADING, false)
                        .addComponent(button3)
                        .addComponent(button6)
                        .addComponent(button9))
        );

        gl.setVerticalGroup(gl.createSequentialGroup()
                .addGroup(gl.createParallelGroup(LEADING)
                        .addComponent(leftLbl)
                        .addComponent(button1)
                        .addComponent(button2)
                        .addComponent(button3))
                .addGroup(gl.createParallelGroup(CENTER)
                        .addComponent(centLbl)
                        .addComponent(button4)
                        .addComponent(button5)
                        .addComponent(button6))
                .addGroup(gl.createParallelGroup(TRAILING)
                        .addComponent(rightLbl)
                        .addComponent(button7)
                        .addComponent(button8)
                        .addComponent(button9))
        );

        pack();

        setTitle("Vertical alignment");
        setLocationRelativeTo(null);
        setDefaultCloseOperation(WindowConstants.EXIT_ON_CLOSE);
    }

    public static void main(String[] args) {

        EventQueue.invokeLater(() -> {

            var ex = new GroupLayoutVertAlignEx();
            ex.setVisible(true);
        });
    }
}
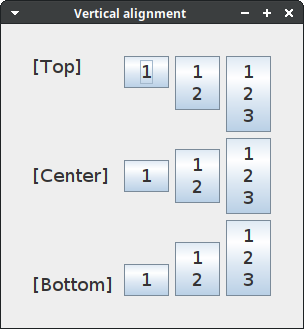
In the horizontal direction, the layout consists of a sequential group of four parallel groups of three components. In the vertical direction, we have a sequential group of three parallel groups of four components.
var button2 = new JButton("<html>1<br>2</html>");
var button3 = new JButton("<html>1<br>2<br>3</html>");
HTML tags are used to create buttons of different heights. When we use
HTML code, the maximum width of a button changes to
Integer.MAX_VALUE. To prevent buttons with HTML code from
growing horizontally, some parallel groups use false for
their resizable parameter.
gl.setVerticalGroup(gl.createSequentialGroup()
        .addGroup(gl.createParallelGroup(LEADING)
                .addComponent(leftLbl)
                .addComponent(button1)
                .addComponent(button2)
                .addComponent(button3))
        .addGroup(gl.createParallelGroup(CENTER)
                .addComponent(centLbl)
                .addComponent(button4)
                .addComponent(button5)
                .addComponent(button6))
        .addGroup(gl.createParallelGroup(TRAILING)
                .addComponent(rightLbl)
                .addComponent(button7)
                .addComponent(button8)
                .addComponent(button9))
);
In the vertical direction, we create a sequential group of three parallel
groups of four components. The LEADING constant aligns the
first group to the top. The CENTER constant aligns the
second group vertically to the centre. The TRAILING
constant aligns the third group to the bottom.
Baseline alignment
Baseline alignment is aligning components along the baseline of the text that they contain. The following example aligns two components along their baseline.
package com.zetcode;

import javax.swing.GroupLayout;
import javax.swing.JComboBox;
import javax.swing.JFrame;
import javax.swing.JLabel;
import javax.swing.WindowConstants;
import java.awt.EventQueue;

import static javax.swing.GroupLayout.Alignment.BASELINE;

public class GroupLayoutBaselineEx extends JFrame {

    private JLabel display;
    private JComboBox<String> box;
    private String[] distros;

    public GroupLayoutBaselineEx() {

        initUI();
    }

    private void initUI() {

        var pane = getContentPane();
        var gl = new GroupLayout(pane);
        pane.setLayout(gl);

        distros = new String[] {"Easy", "Medium", "Hard"};
        box = new JComboBox<>(distros);
        display = new JLabel("Level:");

        gl.setAutoCreateContainerGaps(true);
        gl.setAutoCreateGaps(true);

        gl.setHorizontalGroup(gl.createSequentialGroup()
                .addComponent(display)
                .addComponent(box,
                        GroupLayout.DEFAULT_SIZE,
                        GroupLayout.DEFAULT_SIZE,
                        GroupLayout.PREFERRED_SIZE)
        );

        gl.setVerticalGroup(gl.createParallelGroup(BASELINE)
                .addComponent(box, GroupLayout.DEFAULT_SIZE,
                        GroupLayout.DEFAULT_SIZE,
                        GroupLayout.PREFERRED_SIZE)
                .addComponent(display)
        );

        pack();

        setTitle("Baseline alignment");
        setLocationRelativeTo(null);
        setDefaultCloseOperation(WindowConstants.EXIT_ON_CLOSE);
    }

    public static void main(String[] args) {

        EventQueue.invokeLater(() -> {

            var ex = new GroupLayoutBaselineEx();
            ex.setVisible(true);
        });
    }
}
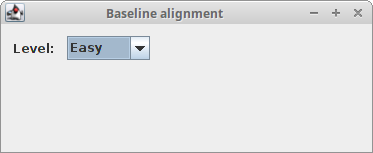
We have a label and a combo box. Both components contain text. We align these two components along the baseline of their text.
gl.setVerticalGroup(gl.createParallelGroup(BASELINE)
        .addComponent(box, GroupLayout.DEFAULT_SIZE,
                GroupLayout.DEFAULT_SIZE,
                GroupLayout.PREFERRED_SIZE)
        .addComponent(display)
);
The baseline alignment is achieved with the BASELINE
parameter passed to the createParallelGroup method in the
vertical layout. This ensures the label and the combo box are aligned
along the baseline of their text.
Corner buttons example
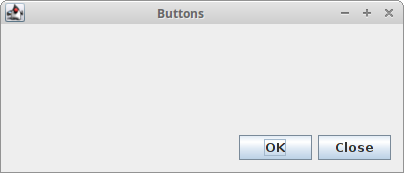
The following example places two buttons in the bottom-right corner of the window. The buttons are made the same size.
package com.zetcode;

import javax.swing.GroupLayout;
import javax.swing.JButton;
import javax.swing.JFrame;
import javax.swing.SwingConstants;
import javax.swing.WindowConstants;
import java.awt.Dimension;
import java.awt.EventQueue;

import static javax.swing.LayoutStyle.ComponentPlacement.RELATED;

public class GroupLayoutCornerButtonsEx extends JFrame {

    public GroupLayoutCornerButtonsEx() {

        initUI();
    }

    private void initUI() {

        setPreferredSize(new Dimension(300, 200));

        var cpane = getContentPane();
        var gl = new GroupLayout(cpane);
        cpane.setLayout(gl);

        gl.setAutoCreateGaps(true);
        gl.setAutoCreateContainerGaps(true);

        var okButton = new JButton("OK");
        var closeButton = new JButton("Close");

        gl.setHorizontalGroup(gl.createSequentialGroup()
                .addPreferredGap(RELATED,
                        GroupLayout.DEFAULT_SIZE, Short.MAX_VALUE)
                .addComponent(okButton)
                .addComponent(closeButton)
        );

        gl.setVerticalGroup(gl.createSequentialGroup()
                .addPreferredGap(RELATED,
                        GroupLayout.DEFAULT_SIZE, Short.MAX_VALUE)
                .addGroup(gl.createParallelGroup()
                        .addComponent(okButton)
                        .addComponent(closeButton))
        );

        gl.linkSize(SwingConstants.HORIZONTAL, okButton, closeButton);

        pack();

        setTitle("Buttons");
        setLocationRelativeTo(null);
        setDefaultCloseOperation(WindowConstants.EXIT_ON_CLOSE);
    }

    public static void main(String[] args) {

        EventQueue.invokeLater(() -> {

            var ex = new GroupLayoutCornerButtonsEx();
            ex.setVisible(true);
        });
    }
}
The example creates the corner buttons with the GroupLayout manager.
gl.setHorizontalGroup(gl.createSequentialGroup()
        .addPreferredGap(RELATED,
                GroupLayout.DEFAULT_SIZE, Short.MAX_VALUE)
        .addComponent(okButton)
        .addComponent(closeButton)
);
In the horizontal layout, we add a stretchable gap followed by the two
buttons. The stretchable gap pushes the buttons to the right edge of
the window. The gap is created with the addPreferredGap
method, which takes the gap type, the preferred size, and the maximum size.
The difference between the maximum and preferred values determines how
much the gap can stretch. When both values are equal, the gap has a
fixed size.
Stretchable gap pushing buttons to the corner:
Horizontal layout:
|[←─stretchable gap──]  [OK]  [Close]|

Vertical layout:
|[←─stretchable gap──]|
|[OK]  [Close]          |
In the horizontal direction, the stretchable gap occupies all available space to the left of the buttons, pushing them to the right edge. In the vertical direction, a stretchable gap above the button row pushes them to the bottom edge. This places the buttons in the bottom-right corner.
gl.setVerticalGroup(gl.createSequentialGroup()
        .addPreferredGap(RELATED,
                GroupLayout.DEFAULT_SIZE, Short.MAX_VALUE)
        .addGroup(gl.createParallelGroup()
                .addComponent(okButton)
                .addComponent(closeButton))
);
In a vertical layout, we add a stretchable gap and a parallel group of two components. Again, the gap pushes the group of buttons to the bottom.
gl.linkSize(SwingConstants.HORIZONTAL, okButton, closeButton);
The linkSize method makes both buttons the same
size. We only need to set their width because their height is already
the same by default.
Password example
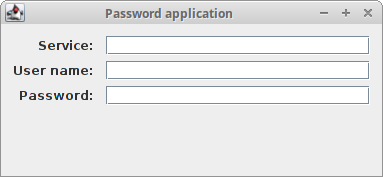
The following layout is common in form-based applications that contain label and text field pairs.
package com.zetcode;

import javax.swing.GroupLayout;
import javax.swing.JFrame;
import javax.swing.JLabel;
import javax.swing.JTextField;
import javax.swing.WindowConstants;
import java.awt.EventQueue;

import static javax.swing.GroupLayout.Alignment.BASELINE;
import static javax.swing.GroupLayout.Alignment.TRAILING;

public class GroupLayoutPasswordEx extends JFrame {

    public GroupLayoutPasswordEx() {

        initUI();
    }

    private void initUI() {

        var pane = getContentPane();
        var gl = new GroupLayout(pane);
        pane.setLayout(gl);

        var serviceLbl = new JLabel("Service:");
        var userNameLbl = new JLabel("User name:");
        var passwordLbl = new JLabel("Password:");

        var field1 = new JTextField(10);
        var field2 = new JTextField(10);
        var field3 = new JTextField(10);

        gl.setAutoCreateGaps(true);
        gl.setAutoCreateContainerGaps(true);

        gl.setHorizontalGroup(gl.createSequentialGroup()
                .addGroup(gl.createParallelGroup(TRAILING)
                        .addComponent(serviceLbl)
                        .addComponent(userNameLbl)
                        .addComponent(passwordLbl))
                .addGroup(gl.createParallelGroup()
                        .addComponent(field1)
                        .addComponent(field2)
                        .addComponent(field3))
        );

        gl.setVerticalGroup(gl.createSequentialGroup()
                .addGroup(gl.createParallelGroup(BASELINE)
                        .addComponent(serviceLbl)
                        .addComponent(field1))
                .addGroup(gl.createParallelGroup(BASELINE)
                        .addComponent(userNameLbl)
                        .addComponent(field2))
                .addGroup(gl.createParallelGroup(BASELINE)
                        .addComponent(passwordLbl)
                        .addComponent(field3))
        );

        pack();

        setTitle("Password application");
        setLocationRelativeTo(null);
        setDefaultCloseOperation(WindowConstants.EXIT_ON_CLOSE);
    }

    public static void main(String[] args) {

        EventQueue.invokeLater(() -> {

            var ex = new GroupLayoutPasswordEx();
            ex.setVisible(true);
        });
    }
}
The requirements are: labels must be right-aligned horizontally, and each label must be aligned vertically to the baseline of its corresponding text field.
gl.setHorizontalGroup(gl.createSequentialGroup()
        .addGroup(gl.createParallelGroup(TRAILING)
                .addComponent(serviceLbl)
                .addComponent(userNameLbl)
                .addComponent(passwordLbl))
        .addGroup(gl.createParallelGroup()
                .addComponent(field1)
                .addComponent(field2)
                .addComponent(field3))
);
Horizontally, the layout consists of two parallel groups packed inside a
sequential group. The labels and text fields are placed in separate parallel
groups. The label group uses the GroupLayout.Alignment.TRAILING
alignment, which right-aligns the labels.
gl.setVerticalGroup(gl.createSequentialGroup()
        .addGroup(gl.createParallelGroup(BASELINE)
                .addComponent(serviceLbl)
                .addComponent(field1))
        .addGroup(gl.createParallelGroup(BASELINE)
                .addComponent(userNameLbl)
                .addComponent(field2))
        .addGroup(gl.createParallelGroup(BASELINE)
                .addComponent(passwordLbl)
                .addComponent(field3))
);
In the vertical layout, we ensure that each label is aligned with its
corresponding text field along the text baseline. This is done by grouping
each label and its field into a parallel group with
GroupLayout.Alignment.BASELINE alignment.
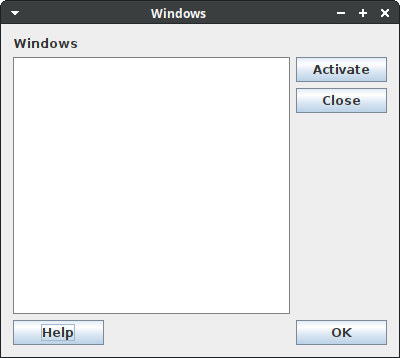
Windows example
The following example creates the Windows layout using the
GroupLayout manager. The layout comes from the JDeveloper
application.
package com.zetcode;

import javax.swing.BorderFactory;
import javax.swing.GroupLayout;
import javax.swing.JButton;
import javax.swing.JFrame;
import javax.swing.JLabel;
import javax.swing.JTextArea;
import javax.swing.WindowConstants;
import java.awt.Color;
import java.awt.EventQueue;

public class GroupLayoutWindowsEx extends JFrame {

    public GroupLayoutWindowsEx() {

        initUI();
    }

    private void initUI() {

        var pane = getContentPane();
        var gl = new GroupLayout(pane);
        pane.setLayout(gl);

        gl.setAutoCreateGaps(true);
        gl.setAutoCreateContainerGaps(true);

        var windows = new JLabel("Windows");

        var area = new JTextArea(17, 25);
        area.setEditable(false);
        area.setBorder(BorderFactory.createLineBorder(Color.gray));

        var activateButton = new JButton("Activate");
        var closeButton = new JButton("Close");
        var helpButton = new JButton("Help");
        var okButton = new JButton("OK");

        gl.setHorizontalGroup(gl.createSequentialGroup()
                .addGroup(gl.createParallelGroup()
                        .addComponent(windows)
                        .addComponent(area)
                        .addComponent(helpButton))
                .addGroup(gl.createParallelGroup()
                        .addComponent(activateButton)
                        .addComponent(closeButton)
                        .addComponent(okButton))
        );

        gl.setVerticalGroup(gl.createSequentialGroup()
                .addComponent(windows)
                .addGroup(gl.createParallelGroup()
                        .addComponent(area)
                        .addGroup(gl.createSequentialGroup()
                                .addComponent(activateButton)
                                .addComponent(closeButton)))
                .addGroup(gl.createParallelGroup()
                        .addComponent(helpButton)
                        .addComponent(okButton))
        );

        gl.linkSize(activateButton, closeButton,
                helpButton, okButton);

        pack();

        setTitle("Windows");
        setLocationRelativeTo(null);
        setDefaultCloseOperation(WindowConstants.EXIT_ON_CLOSE);
    }

    public static void main(String[] args) {

        EventQueue.invokeLater(() -> {

            var ex = new GroupLayoutWindowsEx();
            ex.setVisible(true);
        });
    }
}
The layout consists of one label, four buttons, and a text area. The buttons have the same size.
gl.setHorizontalGroup(gl.createSequentialGroup()
        .addGroup(gl.createParallelGroup()
                .addComponent(windows)
                .addComponent(area)
                .addComponent(helpButton))
        .addGroup(gl.createParallelGroup()
                .addComponent(activateButton)
                .addComponent(closeButton)
                .addComponent(okButton))
);
The horizontal layout consists of a sequential group of two parallel groups of three components.
gl.setVerticalGroup(gl.createSequentialGroup()
        .addComponent(windows)
        .addGroup(gl.createParallelGroup()
                .addComponent(area)
                .addGroup(gl.createSequentialGroup()
                        .addComponent(activateButton)
                        .addComponent(closeButton)))
        .addGroup(gl.createParallelGroup()
                .addComponent(helpButton)
                .addComponent(okButton))
);
The vertical layout starts with a single component. Then, we add a parallel group of a single component and a sequential group of two components. Finally, we add a parallel group of two components.
Review example
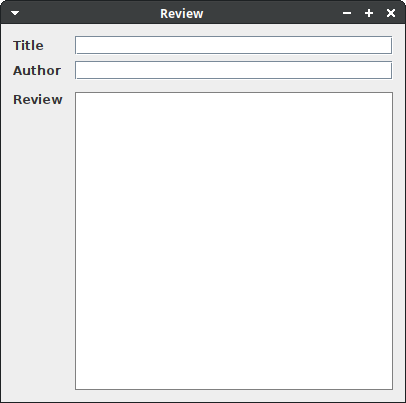
The Review example demonstrates the usage of the BASELINE
alignment.
package com.zetcode;

import javax.swing.BorderFactory;
import javax.swing.GroupLayout;
import javax.swing.JFrame;
import javax.swing.JLabel;
import javax.swing.JTextArea;
import javax.swing.JTextField;
import javax.swing.WindowConstants;
import java.awt.Color;
import java.awt.EventQueue;

import static javax.swing.LayoutStyle.ComponentPlacement.UNRELATED;
import static javax.swing.GroupLayout.Alignment.BASELINE;

public class GroupLayoutReviewEx extends JFrame {

    public GroupLayoutReviewEx() {

        initUI();
    }

    private void initUI() {

        var pane = getContentPane();
        var gl = new GroupLayout(pane);
        pane.setLayout(gl);

        gl.setAutoCreateGaps(true);
        gl.setAutoCreateContainerGaps(true);

        var title = new JLabel("Title");
        var author = new JLabel("Author");
        var review = new JLabel("Review");

        var field1 = new JTextField();
        var field2 = new JTextField();
        var area = new JTextArea(12, 18);
        area.setBorder(BorderFactory.createLineBorder(Color.gray));

        gl.setHorizontalGroup(gl.createSequentialGroup()
                .addGroup(gl.createParallelGroup()
                        .addComponent(title)
                        .addComponent(author)
                        .addComponent(review))
                .addGroup(gl.createParallelGroup()
                        .addComponent(field1)
                        .addComponent(field2)
                        .addComponent(area))
        );

        gl.setVerticalGroup(gl.createSequentialGroup()
                .addGroup(gl.createParallelGroup(BASELINE)
                        .addComponent(title)
                        .addComponent(field1))
                .addGroup(gl.createParallelGroup(BASELINE)
                        .addComponent(author)
                        .addComponent(field2))
                .addPreferredGap(UNRELATED)
                .addGroup(gl.createParallelGroup()
                        .addComponent(review)
                        .addComponent(area))
        );

        pack();

        setTitle("Review");
        setLocationRelativeTo(null);
        setDefaultCloseOperation(WindowConstants.EXIT_ON_CLOSE);
    }

    public static void main(String[] args) {

        EventQueue.invokeLater(() -> {

            var ex = new GroupLayoutReviewEx();
            ex.setVisible(true);
        });
    }
}
This layout consists of three labels, two text fields, and a text area.
gl.setHorizontalGroup(gl.createSequentialGroup()
        .addGroup(gl.createParallelGroup()
                .addComponent(title)
                .addComponent(author)
                .addComponent(review))
        .addGroup(gl.createParallelGroup()
                .addComponent(field1)
                .addComponent(field2)
                .addComponent(area))
);
In this code excerpt, we create two parallel groups inside a sequential
group. In the first parallel group, the labels have different sizes. The
LEADING is the default alignment of a
ParallelGroup. For the horizontal axis with a left-to-right
orientation, this means alignment to the left edge. In the second
parallel group, all components have the same width, so the alignment has
no effect.
gl.setVerticalGroup(gl.createSequentialGroup()
        .addGroup(gl.createParallelGroup(BASELINE)
                .addComponent(title)
                .addComponent(field1))
        .addGroup(gl.createParallelGroup(BASELINE)
                .addComponent(author)
                .addComponent(field2))
        .addPreferredGap(UNRELATED)
        .addGroup(gl.createParallelGroup()
                .addComponent(review)
                .addComponent(area))
);
The BASELINE constant makes the components aligned along
their baselines. It also prevents the text fields from growing
vertically.
Go To Class example
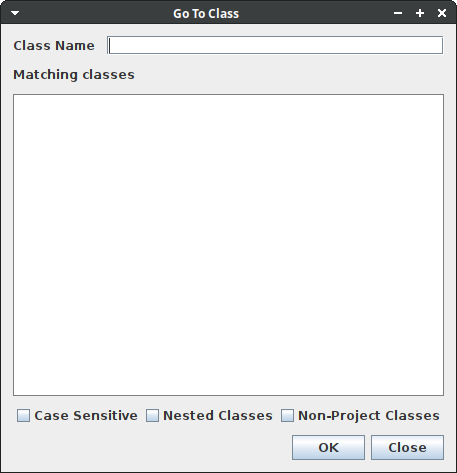
The next example creates the Go To Class window layout using the
GroupLayout manager. The layout comes from the Eclipse
application.
package com.zetcode;

import javax.swing.BorderFactory;
import javax.swing.GroupLayout;
import javax.swing.JButton;
import javax.swing.JCheckBox;
import javax.swing.JFrame;
import javax.swing.JLabel;
import javax.swing.JTextArea;
import javax.swing.JTextField;
import javax.swing.WindowConstants;

import java.awt.Color;
import java.awt.EventQueue;

import static javax.swing.GroupLayout.Alignment.BASELINE;
import static javax.swing.LayoutStyle.ComponentPlacement.RELATED;
import static javax.swing.LayoutStyle.ComponentPlacement.UNRELATED;

public class GroupLayoutGoToClassEx extends JFrame {

    public GroupLayoutGoToClassEx() {

        initUI();
    }

    private void initUI() {

        var pane = getContentPane();
        var gl = new GroupLayout(pane);
        pane.setLayout(gl);

        gl.setAutoCreateGaps(true);
        gl.setAutoCreateContainerGaps(true);

        var name = new JLabel("Class Name");
        var field = new JTextField();
        var matching = new JLabel("Matching classes");

        var area = new JTextArea(20, 20);
        area.setBorder(BorderFactory.createLineBorder(Color.gray));

        var sensitive = new JCheckBox("Case Sensitive");
        var nested = new JCheckBox("Nested Classes");
        var nonproject = new JCheckBox("Non-Project Classes");
        var okButton = new JButton("OK");
        var closeButton = new JButton("Close");

        gl.setHorizontalGroup(gl.createSequentialGroup()
                .addGroup(gl.createParallelGroup()
                        .addGroup(gl.createSequentialGroup()
                                .addComponent(name)
                                .addComponent(field))
                        .addComponent(matching)
                        .addComponent(area)
                        .addGroup(gl.createSequentialGroup()
                                .addComponent(sensitive)
                                .addComponent(nested)
                                .addComponent(nonproject))
                        .addGroup(gl.createSequentialGroup()
                                .addPreferredGap(RELATED, GroupLayout.DEFAULT_SIZE,
                                        Short.MAX_VALUE)
                                .addComponent(okButton)
                                .addComponent(closeButton))));

        gl.setVerticalGroup(gl.createSequentialGroup()
                .addGroup(gl.createParallelGroup(BASELINE)
                        .addComponent(name)
                        .addComponent(field))
                .addPreferredGap(UNRELATED)
                .addComponent(matching)
                .addPreferredGap(UNRELATED)
                .addComponent(area)
                .addPreferredGap(UNRELATED)
                .addGroup(gl.createParallelGroup()
                        .addComponent(sensitive)
                        .addComponent(nested)
                        .addComponent(nonproject))
                .addPreferredGap(UNRELATED)
                .addGroup(gl.createParallelGroup()
                        .addComponent(okButton)
                        .addComponent(closeButton)));

        gl.linkSize(okButton, closeButton);

        pack();

        setTitle("Go To Class");
        setLocationRelativeTo(null);
        setDefaultCloseOperation(WindowConstants.EXIT_ON_CLOSE);
    }

    public static void main(String[] args) {

        EventQueue.invokeLater(() -> {

            var ex = new GroupLayoutGoToClassEx();
            ex.setVisible(true);
        });
    }
}
In the layout, we have two labels, one text field, one text area, three check boxes, and two buttons.
.addGroup(gl.createSequentialGroup()
        .addPreferredGap(RELATED,
                GroupLayout.DEFAULT_SIZE, Short.MAX_VALUE)
        .addComponent(okButton)
        .addComponent(closeButton))
The resizable preferred gap pushes the two buttons to the right of the
window. The gap is resizable between
GroupLayout.DEFAULT_SIZE and Short.MAX_VALUE.
.addPreferredGap(UNRELATED)
.addComponent(matching)
.addPreferredGap(UNRELATED)
When we set the automatic creation of gaps, the manager creates gaps
between the components for us. We can modify the outcome with additional
gaps. Here the code adds fixed preferred gaps above and below the
Matching classes label.
Tags example
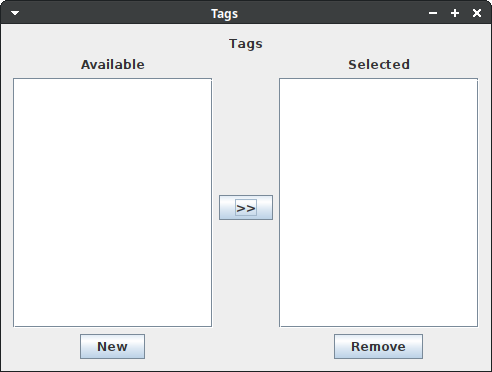
The next example has two list components. One of them stores available tags, the other one selected tags. There is one button between the list components.
package com.zetcode;

import javax.swing.GroupLayout;
import javax.swing.JButton;
import javax.swing.JFrame;
import javax.swing.JLabel;
import javax.swing.JList;
import javax.swing.JScrollPane;
import javax.swing.WindowConstants;

import java.awt.EventQueue;

import static javax.swing.GroupLayout.Alignment.CENTER;
import static javax.swing.GroupLayout.DEFAULT_SIZE;

public class GroupLayoutTagsEx extends JFrame {

    public GroupLayoutTagsEx() {

        initUI();
    }

    private void initUI() {

        var pane = getContentPane();
        var gl = new GroupLayout(pane);
        pane.setLayout(gl);

        gl.setAutoCreateGaps(true);
        gl.setAutoCreateContainerGaps(true);

        var avLbl = new JLabel("Available");
        var tagsLbl = new JLabel("Tags");
        var selLbl = new JLabel("Selected");

        var newBtn = new JButton("New");
        var moveBtn = new JButton(">>");
        var remBtn = new JButton("Remove");

        var leftList = new JList<>();
        var spleft = new JScrollPane(leftList);
        var rightList = new JList<>();
        var spright = new JScrollPane(rightList);

        gl.setHorizontalGroup(gl.createParallelGroup(CENTER)
                .addComponent(tagsLbl)
                .addGroup(gl.createSequentialGroup()
                        .addGroup(gl.createParallelGroup(CENTER)
                                .addComponent(avLbl)
                                .addComponent(spleft, 100, 200,
                                        Short.MAX_VALUE)
                                .addComponent(newBtn))
                        .addComponent(moveBtn)
                        .addGroup(gl.createParallelGroup(CENTER)
                                .addComponent(selLbl)
                                .addComponent(spright, 100, 200,
                                        Short.MAX_VALUE)
                                .addComponent(remBtn)))
        );

        gl.setVerticalGroup(gl.createSequentialGroup()
                .addComponent(tagsLbl)
                .addGroup(gl.createParallelGroup(CENTER)
                        .addGroup(gl.createSequentialGroup()
                                .addComponent(avLbl)
                                .addComponent(spleft, 100, 250,
                                        DEFAULT_SIZE)
                                .addComponent(newBtn))
                        .addComponent(moveBtn)
                        .addGroup(gl.createSequentialGroup()
                                .addComponent(selLbl)
                                .addComponent(spright, 100, 250,
                                        DEFAULT_SIZE)
                                .addComponent(remBtn)))
        );

        pack();

        setTitle("Tags");
        setLocationRelativeTo(null);
        setDefaultCloseOperation(WindowConstants.EXIT_ON_CLOSE);
    }

    public static void main(String[] args) {

        EventQueue.invokeLater(() -> {

            var ex = new GroupLayoutTagsEx();
            ex.setVisible(true);
        });
    }
}
The components that need to be centred are placed into parallel groups
with the GroupLayout.Alignment.CENTER alignment.
gl.setHorizontalGroup(gl.createParallelGroup(CENTER)
        .addComponent(tagsLbl)
        .addGroup(gl.createSequentialGroup()
                .addGroup(gl.createParallelGroup(CENTER)
                        .addComponent(avLbl)
                        .addComponent(spleft, 100, 200, Short.MAX_VALUE)
                        .addComponent(newBtn))
                .addComponent(moveBtn)
                .addGroup(gl.createParallelGroup(CENTER)
                        .addComponent(selLbl)
                        .addComponent(spright, 100, 200, Short.MAX_VALUE)
                        .addComponent(remBtn)))
);
The base group of the horizontal layout is a centred parallel group. This causes the tags label to be centred. The layout is then divided into a sequential group of two parallel groups and a button located between them.
gl.setVerticalGroup(gl.createSequentialGroup()
        .addComponent(tagsLbl)
        .addGroup(gl.createParallelGroup(CENTER)
                .addGroup(gl.createSequentialGroup()
                        .addComponent(avLbl)
                        .addComponent(spleft, 100, 250, DEFAULT_SIZE)
                        .addComponent(newBtn))
                .addComponent(moveBtn)
                .addGroup(gl.createSequentialGroup()
                        .addComponent(selLbl)
                        .addComponent(spright, 100, 250, DEFAULT_SIZE)
                        .addComponent(remBtn)))
);
The vertical layout is a sequential group of a component and a centred
parallel group. Here the CENTER alignment makes the Move
button vertically centred.
In this article, we have explored the built-in GroupLayout
manager. We covered horizontal and vertical group definitions, resolution-independent
gaps (fixed, automatic, and resizable), indented gaps, parallel and sequential
grouping, alignment options (leading, centre, trailing, and baseline),
link sizing, and several practical examples including grid layouts, form
layouts, and complex window arrangements from real-world applications.
List all Java tutorials.