Menus and toolbars in Java Swing
last modified January 10, 2023
In this part of the Java Swing tutorial, we are going to work with menus and toolbars. In the examples we will create regular menus, submenus, checbox menu items, radio button menu items, popup menus, and toolbars.
A menu is a group of commands located in a menubar. A toolbar has buttons with some common commands in the application.
We are going to use the following components:
JMenuBar— implements a menu bar.JMenu— implements a menu, a popup window containingJMenuItemsthat is displayed when the user selects an item on theJMenuBar.JMenuItem— implements an item in a menu. It is selected by the user to perform an action.JSeparator— provides a general purpose component for implementing divider lines.JCheckBoxMenuItem— implements a menu that can be selected or deselected.JRadioButtonMenuItem— implements a radio button menu item, used for mutually exclusive selection.ButtonGroup— creates a multiple-exclusion scope for a set of buttons.JPopupMenu— implements a popup menu, a small window that pops up and displays a series of choices.JToolBar— implements a toolbar, a component that is useful for displaying commonly usedActionsor controls.
Swing JMenuBar
We begin with a simple menubar example.
package com.zetcode;

import java.awt.EventQueue;
import java.awt.event.KeyEvent;
import javax.swing.ImageIcon;
import javax.swing.JFrame;
import javax.swing.JMenu;
import javax.swing.JMenuBar;
import javax.swing.JMenuItem;

public class SimpleMenuEx extends JFrame {

    public SimpleMenuEx() {

        initUI();
    }

    private void initUI() {

        createMenuBar();

        setTitle("Simple menu");
        setSize(350, 250);
        setLocationRelativeTo(null);
        setDefaultCloseOperation(EXIT_ON_CLOSE);
    }

    private void createMenuBar() {

        var menuBar = new JMenuBar();
        var exitIcon = new ImageIcon("src/resources/exit.png");

        var fileMenu = new JMenu("File");
        fileMenu.setMnemonic(KeyEvent.VK_F);

        var eMenuItem = new JMenuItem("Exit", exitIcon);
        eMenuItem.setMnemonic(KeyEvent.VK_E);
        eMenuItem.setToolTipText("Exit application");
        eMenuItem.addActionListener((event) -> System.exit(0));

        fileMenu.add(eMenuItem);
        menuBar.add(fileMenu);

        setJMenuBar(menuBar);
    }

    public static void main(String[] args) {

        EventQueue.invokeLater(() -> {

            var ex = new SimpleMenuEx();
            ex.setVisible(true);
        });
    }
}
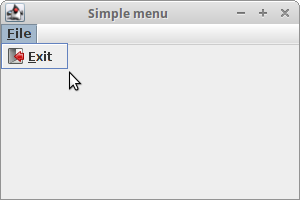
Our example will show a menu with one item. Selecting the Exit menu item we close the application.
var menuBar = new JMenuBar();
A menubar is created with JMenuBar.
var exitIcon = new ImageIcon("src/resources/exit.png");
An Exit icon is displayed in the menu.
var fileMenu = new JMenu("File");
fileMenu.setMnemonic(KeyEvent.VK_F);
A menu object is created with the JMenu class. The menus can be accessed
via keyboard as well. To bind a menu to a particular key, we use the setMnemonic()
method. In our case, the menu can be opened with the Alt+F shortcut.
var eMenuItem = new JMenuItem("Exit", exitIcon);
eMenuItem.setMnemonic(KeyEvent.VK_E);
A menu object consists of menu items. A menu item is created with the
JMenuItem class. A menu item has its own mnemonic.
It can be activated with the Alt+F+E
key combination.
eMenuItem.setToolTipText("Exit application");
This code line creates a tooltip for the menu item.
eMenuItem.addActionListener((event) -> System.exit(0));
JMenuItem is a special kind of a button component. We add an action
listener to it, which terminates the application.
fileMenu.add(eMenuItem);
menuBar.add(fileMenu);
The menu item is added to the menu object and the menu object is inserted into the menubar.
setJMenuBar(menuBar);
The setJMenuBar() method sets the menubar for the
JFrame container.
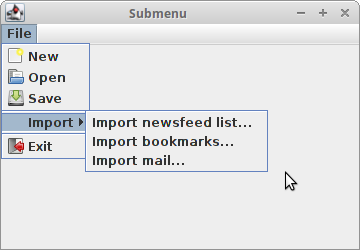
Swing submenu
Each menu can also have a submenu. This way we can put similar commands into groups. For example, we can place commands that hide and show various toolbars like personal bar, address bar, status bar or navigation bar into a submenu called toolbars. Within a menu, we can separate commands with a separator. The separator is a simple line. It is common practice to separate commands like New, Open, Save from commands like Print, Print preview with a single separator. In addition to mnemonics, menu commands can be launched via accelerators.
package com.zetcode;

import javax.swing.ImageIcon;
import javax.swing.JFrame;
import javax.swing.JMenu;
import javax.swing.JMenuBar;
import javax.swing.JMenuItem;
import java.awt.EventQueue;

public class SubmenuEx extends JFrame {

    public SubmenuEx() {

        initUI();
    }

    private void initUI() {

        createMenuBar();

        setTitle("Submenu");
        setSize(360, 250);
        setLocationRelativeTo(null);
        setDefaultCloseOperation(EXIT_ON_CLOSE);
    }

    private void createMenuBar() {

        var menuBar = new JMenuBar();

        var iconNew = new ImageIcon("src/resources/new.png");
        var iconOpen = new ImageIcon("src/resources/open.png");
        var iconSave = new ImageIcon("src/resources/save.png");
        var iconExit = new ImageIcon("src/resources/exit.png");

        var fileMenu = new JMenu("File");
        var impMenu = new JMenu("Import");

        var newsMenuItem = new JMenuItem("Import newsfeed list...");
        var bookmarksMenuItem = new JMenuItem("Import bookmarks...");
        var importMailMenuItem = new JMenuItem("Import mail...");

        impMenu.add(newsMenuItem);
        impMenu.add(bookmarksMenuItem);
        impMenu.add(importMailMenuItem);

        var newMenuItem = new JMenuItem("New", iconNew);
        var openMenuItem = new JMenuItem("Open", iconOpen);
        var saveMenuItem = new JMenuItem("Save", iconSave);

        var exitMenuItem = new JMenuItem("Exit", iconExit);
        exitMenuItem.setToolTipText("Exit application");

        exitMenuItem.addActionListener((event) -> System.exit(0));

        fileMenu.add(newMenuItem);
        fileMenu.add(openMenuItem);
        fileMenu.add(saveMenuItem);
        fileMenu.addSeparator();
        fileMenu.add(impMenu);
        fileMenu.addSeparator();
        fileMenu.add(exitMenuItem);

        menuBar.add(fileMenu);

        setJMenuBar(menuBar);
    }

    public static void main(String[] args) {

        EventQueue.invokeLater(() -> {

            var ex = new SubmenuEx();
            ex.setVisible(true);
        });
    }
}
This example creates a submenu and separates the groups of menu items with a menu separator.
var impMenu = new JMenu("Import");
...
fileMenu.add(impMenu);
A submenu is just like any other normal menu. It is created the same way. We simply add a menu to existing menu.
exitMenuItem.setToolTipText("Exit application");
A tooltip is set to the Exit menu item with the setToolTipText()
method.
var newMenuItem = new JMenuItem("New", iconNew);
This JMenuItem constructor creates a menu item with a label and
an icon.
fileMenu.addSeparator();
A separator is a horizontal line that visually separates menu items.
This way we can group items into some logical places. A separator is
created with the addSeparator() method.
Swing mnemonics and accelerators
Mnemonics and accelerators are shortcut keys that enable executing commands via keyboard. Mnemonics navigate the menu hierarchy to select a specific menu item whereas accelerators bypass menu hierarchy and directly activate the menu item.
The following example utilizes actions, which are objects that can be shared by different components that need the same functionality.
package com.zetcode;

import javax.swing.AbstractAction;
import javax.swing.ImageIcon;
import javax.swing.JFrame;
import javax.swing.JMenu;
import javax.swing.JMenuBar;
import javax.swing.JMenuItem;
import javax.swing.KeyStroke;
import java.awt.EventQueue;
import java.awt.event.ActionEvent;
import java.awt.event.InputEvent;
import java.awt.event.KeyEvent;

public class ShortcutsEx extends JFrame {

    public ShortcutsEx() {

        initUI();
    }

    private void initUI() {

        createMenuBar();

        setTitle("Mnemonics and accelerators");
        setSize(360, 250);
        setLocationRelativeTo(null);
        setDefaultCloseOperation(EXIT_ON_CLOSE);
    }

    private void createMenuBar() {

        var menuBar = new JMenuBar();

        var iconNew = new ImageIcon("src/resources/new.png");
        var iconOpen = new ImageIcon("src/resources/open.png");
        var iconSave = new ImageIcon("src/resources/save.png");
        var iconExit = new ImageIcon("src/resources/exit.png");

        var fileMenu = new JMenu("File");
        fileMenu.setMnemonic(KeyEvent.VK_F);

        var newMenuItem = new JMenuItem(new MenuItemAction("New", iconNew,
                KeyEvent.VK_N));

        var openMenuItem = new JMenuItem(new MenuItemAction("Open", iconOpen,
                KeyEvent.VK_O));

        var saveMenuItem = new JMenuItem(new MenuItemAction("Save", iconSave,
                KeyEvent.VK_S));

        var exitMenuItem = new JMenuItem("Exit", iconExit);
        exitMenuItem.setMnemonic(KeyEvent.VK_E);
        exitMenuItem.setToolTipText("Exit application");
        exitMenuItem.setAccelerator(KeyStroke.getKeyStroke(KeyEvent.VK_W,
                InputEvent.CTRL_DOWN_MASK));

        exitMenuItem.addActionListener((event) -> System.exit(0));

        fileMenu.add(newMenuItem);
        fileMenu.add(openMenuItem);
        fileMenu.add(saveMenuItem);
        fileMenu.addSeparator();
        fileMenu.add(exitMenuItem);

        menuBar.add(fileMenu);

        setJMenuBar(menuBar);
    }

    private class MenuItemAction extends AbstractAction {

        public MenuItemAction(String text, ImageIcon icon,
                              Integer mnemonic) {
            super(text);

            putValue(SMALL_ICON, icon);
            putValue(MNEMONIC_KEY, mnemonic);
        }

        @Override
        public void actionPerformed(ActionEvent e) {

            System.out.println(e.getActionCommand());
        }
    }

    public static void main(String[] args) {

        EventQueue.invokeLater(() -> {

            var ex = new ShortcutsEx();
            ex.setVisible(true);
        });
    }
}
The example has several mnemonics and one accelerator. Three menu items share an action object. Selecting those three menu items causes their action commands to be printed to the console.
var fileMenu = new JMenu("File");
fileMenu.setMnemonic(KeyEvent.VK_F);
A mnemonic is set to the File menu. The menu can be activated now with the Alt+F shortcut key.
var newMenuItem = new JMenuItem(new MenuItemAction("New", iconNew,
        KeyEvent.VK_N));
The New menu item takes an action object as a parameter. Its constructor takes a text label, icon, and a mnemonic key as parameters.
exitMenuItem.setMnemonic(KeyEvent.VK_E);
The Exit menu item does not use the action object. Its functionality is built
separately. We call the setMnemonic() method to set a mnemonic key.
To use a mnemonic, the component must be visible on the screen.
So we must first activate the menu object, which makes the
Exit menu item visible, and then we can activate this menu item. This means
that this menu item is activated by the Alt+F+E
key combination.
exitMenuItem.setAccelerator(KeyStroke.getKeyStroke(KeyEvent.VK_W,
        ActionEvent.CTRL_MASK));
An accelerator is a key shortcut that directly launches a menu item. In our case,
by pressing Ctrl+W we close the application. An accelerator
is set with the setAccelerator() method.
private class MenuItemAction extends AbstractAction {

    public MenuItemAction(String text, ImageIcon icon,
            Integer mnemonic) {
        super(text);

        putValue(SMALL_ICON, icon);
        putValue(MNEMONIC_KEY, mnemonic);
    }

    @Override
    public void actionPerformed(ActionEvent e) {

        System.out.println(e.getActionCommand());
    }
}
An instance of this action class is shared by three menu items.
Actions use various keys to define their functionality.
The putValue() method associates string values
with the specified keys.
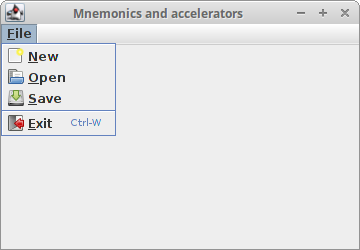
Mnemonics are visually hinted by underlined characters, the accelerators have their shortcut keys shown next to the menu item's label.
JCheckBoxMenuItem
A JCheckBoxMenuItem is a menu item that can be selected or deselected.
If selected, the menu item typically appears with a checkmark next to it.
If unselected or deselected, the menu item appears without a checkmark.
Like a regular menu item, a check box menu item can have either text or a graphic
icon associated with it, or both.
package com.zetcode;

import java.awt.BorderLayout;
import java.awt.EventQueue;
import java.awt.event.ItemEvent;
import java.awt.event.KeyEvent;
import javax.swing.BorderFactory;
import javax.swing.JCheckBoxMenuItem;
import javax.swing.JFrame;
import javax.swing.JLabel;
import javax.swing.JMenu;
import javax.swing.JMenuBar;

public class CheckBoxMenuItemEx extends JFrame {

    private JLabel statusBar;

    public CheckBoxMenuItemEx() {

        initUI();
    }

    private void initUI() {

        createMenuBar();

        statusBar = new JLabel("Ready");
        statusBar.setBorder(BorderFactory.createEtchedBorder());
        add(statusBar, BorderLayout.SOUTH);

        setTitle("JCheckBoxMenuItem");
        setSize(360, 250);
        setLocationRelativeTo(null);
        setDefaultCloseOperation(EXIT_ON_CLOSE);
    }

    private void createMenuBar() {

        var menuBar = new JMenuBar();
        var fileMenu = new JMenu("File");
        fileMenu.setMnemonic(KeyEvent.VK_F);

        var viewMenu = new JMenu("View");
        viewMenu.setMnemonic(KeyEvent.VK_V);

        var showStatusBarMenuItem = new JCheckBoxMenuItem("Show statubar");
        showStatusBarMenuItem.setMnemonic(KeyEvent.VK_S);
        showStatusBarMenuItem.setDisplayedMnemonicIndex(5);
        showStatusBarMenuItem.setSelected(true);

        showStatusBarMenuItem.addItemListener((e) -> {
            if (e.getStateChange() == ItemEvent.SELECTED) {
                statusBar.setVisible(true);
            } else {
                statusBar.setVisible(false);
            }
        });

        viewMenu.add(showStatusBarMenuItem);

        menuBar.add(fileMenu);
        menuBar.add(viewMenu);

        setJMenuBar(menuBar);
    }

    public static void main(String[] args) {

        EventQueue.invokeLater(() -> {

            var ex = new CheckBoxMenuItemEx();
            ex.setVisible(true);
        });
    }
}
This example uses a JCheckBoxMenuItem to toggle the
visibility of a statusbar.
statusBar = new JLabel("Ready");
statusBar.setBorder(BorderFactory.createEtchedBorder());
add(statusBar, BorderLayout.SOUTH);
The statusbar is a simple JLabel component. We put a
raised EtchedBorder around the label so that it is visible.
var showStatusBarMenuItem = new JCheckBoxMenuItem("Show statubar");
showStatusBarMenuItem.setMnemonic(KeyEvent.VK_S);
showStatusBarMenuItem.setDisplayedMnemonicIndex(5);
JCheckBoxMenuItem creates a check box menu item.
There are two s letters in the label; therefore, we use the
setDisplayedMnemonicIndex() method to choose which
one is going to be underlined. We chose the second one.
showStatusBarMenuItem.setSelected(true);
Because the statusbar is initially visible, we call the
JCheckBoxMenuItem's setSelected() method to select it.
showStatusBarMenuItem.addItemListener((e) -> {
    if (e.getStateChange() == ItemEvent.SELECTED) {
        statusbar.setVisible(true);
    } else {
        statusbar.setVisible(false);
    }
});
JCheckBoxMenuItem is a special kind of a button component.
It implements the ItemSelectable interface. An ItemListener
can be used to listen to its state changes. Depending on its state, we show or
hide the statusbar.

JRadioButtonMenuItem
JRadioButtonMenuItem enables to select from a mutually exclusive
list of options. Selecting a particular JRadioButtonMenuItem
deselects all other items. JRadioButtonMenuItems are placed into
a ButtonGroup.
package com.zetcode;

import javax.swing.BorderFactory;
import javax.swing.ButtonGroup;
import javax.swing.JFrame;
import javax.swing.JLabel;
import javax.swing.JMenu;
import javax.swing.JMenuBar;
import javax.swing.JRadioButtonMenuItem;
import java.awt.BorderLayout;
import java.awt.EventQueue;
import java.awt.event.ItemEvent;
import java.awt.event.KeyEvent;

public class RadioMenuItemEx extends JFrame {

    private JLabel statusBar;

    public RadioMenuItemEx() {

        initUI();
    }

    private void initUI() {

        createMenuBar();

        statusBar = new JLabel("Easy");
        statusBar.setBorder(BorderFactory.createEtchedBorder());
        add(statusBar, BorderLayout.SOUTH);

        setTitle("JRadioButtonMenuItem");
        setSize(360, 250);
        setLocationRelativeTo(null);
        setDefaultCloseOperation(EXIT_ON_CLOSE);
    }

    private void createMenuBar() {

        var menuBar = new JMenuBar();
        var difMenu = new JMenu("Difficulty");
        difMenu.setMnemonic(KeyEvent.VK_F);

        var difGroup = new ButtonGroup();

        var easyRMenuItem = new JRadioButtonMenuItem("Easy");
        easyRMenuItem.setSelected(true);
        difMenu.add(easyRMenuItem);

        easyRMenuItem.addItemListener((e) -> {
            if (e.getStateChange() == ItemEvent.SELECTED) {
                statusBar.setText("Easy");
            }
        });

        var mediumRMenuItem = new JRadioButtonMenuItem("Medium");
        difMenu.add(mediumRMenuItem);

        mediumRMenuItem.addItemListener((e) -> {
            if (e.getStateChange() == ItemEvent.SELECTED) {
                statusBar.setText("Medium");
            }
        });

        var hardRMenuItem = new JRadioButtonMenuItem("Hard");
        difMenu.add(hardRMenuItem);

        hardRMenuItem.addItemListener((e) -> {
            if (e.getStateChange() == ItemEvent.SELECTED) {
                statusBar.setText("Hard");
            }
        });

        difGroup.add(easyRMenuItem);
        difGroup.add(mediumRMenuItem);
        difGroup.add(hardRMenuItem);

        menuBar.add(difMenu);

        setJMenuBar(menuBar);
    }

    public static void main(String[] args) {

        EventQueue.invokeLater(() -> {

            var ex = new RadioMenuItemEx();
            ex.setVisible(true);
        });
    }
}
The example creates a menu with three JRadioButtonMenuItem
components.
var difGroup = new ButtonGroup();
The ButtonGroup is used to create a multiple-exclusion scope
for a set of buttons.
var easyRMenuItem = new JRadioButtonMenuItem("Easy");
easyRMenuItem.setSelected(true);
difMenu.add(easyRMenuItem);
A new JRadioButtonMenuItem is created. It is selected with the
setSelected() method and placed into a button group with
the add() method.
easyRMenuItem.addItemListener((e) -> {
    if (e.getStateChange() == ItemEvent.SELECTED) {
        statusbar.setText("Easy");
    }
});
An ItemListener is used for listening to events of
the JRadioButtonMenuItem. The getStateChange()
determines the type of state change. If the change is ItemEvent.SELECTED,
we change the status on the statusbar. (The another state change is ItemEvent.DESELECTED.)

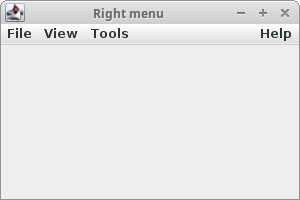
Menu on the right side
Some applications display a menu on the right side. Typically, it is a Help menu.
package com.zetcode;

import java.awt.EventQueue;
import javax.swing.Box;
import javax.swing.JFrame;
import javax.swing.JMenu;
import javax.swing.JMenuBar;

public class RightMenuEx extends JFrame {

    public RightMenuEx() {

        initUI();
    }

    private void initUI() {

        createMenuBar();

        setTitle("Right menu");
        setSize(300, 200);
        setLocationRelativeTo(null);
        setDefaultCloseOperation(EXIT_ON_CLOSE);
    }

    private void createMenuBar() {

        var menuBar = new JMenuBar();

        var fileMenu = new JMenu("File");
        var viewMenu = new JMenu("View");
        var toolsMenu = new JMenu("Tools");
        var helpMenu = new JMenu("Help");

        menuBar.add(fileMenu);
        menuBar.add(viewMenu);
        menuBar.add(toolsMenu);
        menuBar.add(Box.createHorizontalGlue());
        menuBar.add(helpMenu);

        setJMenuBar(menuBar);
    }

    public static void main(String[] args) {

        EventQueue.invokeLater(() -> {

            var ex = new RightMenuEx();
            ex.setVisible(true);
        });
    }
}
The example shows three menus on the left and one menu on the right.
var menubar = new JMenuBar();

var fileMenu = new JMenu("File");
var viewMenu = new JMenu("View");
var toolsMenu = new JMenu("Tools");
var helpMenu = new JMenu("Help");
A menubar and four menu objects are created.
menuBar.add(fileMenu);
menuBar.add(viewMenu);
menuBar.add(toolsMenu);
menuBar.add(Box.createHorizontalGlue());
menuBar.add(helpMenu);
After three menus are added, we add a horizontal glue to the menubar using the
Box.createHorizontalGlue() method. A glue absorbs all
the extra space available. This will push the Help menu to the right of the menubar.
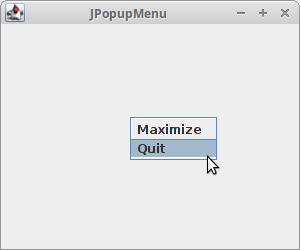
A popup menu
Another type of a menu is a popup menu. Java Swing has a JPopupMenu class
for this functionality. It is also called a context menu and
usually shown when we right click on a component. The idea is to provide
only the commands that are relevant in the current context. Say we have an image.
By right clicking on the image, we get a popup window with commands to save, scale,
or move the image.
package com.zetcode;

import java.awt.EventQueue;
import java.awt.event.MouseAdapter;
import java.awt.event.MouseEvent;
import javax.swing.JFrame;
import javax.swing.JMenuItem;
import javax.swing.JPopupMenu;

public class PopupMenuEx extends JFrame {

    private JPopupMenu popupMenu;

    public PopupMenuEx() {

        initUI();
    }

    private void initUI() {

        createPopupMenu();

        setTitle("JPopupMenu");
        setSize(300, 250);
        setLocationRelativeTo(null);
        setDefaultCloseOperation(JFrame.EXIT_ON_CLOSE);
    }

    private void createPopupMenu() {

        popupMenu = new JPopupMenu();

        var maximizeMenuItem = new JMenuItem("Maximize");
        maximizeMenuItem.addActionListener((e) -> {
            if (getExtendedState() != JFrame.MAXIMIZED_BOTH) {
                setExtendedState(JFrame.MAXIMIZED_BOTH);
                maximizeMenuItem.setEnabled(false);
            }
        });

        popupMenu.add(maximizeMenuItem);

        var quitMenuItem = new JMenuItem("Quit");
        quitMenuItem.addActionListener((e) -> System.exit(0));

        popupMenu.add(quitMenuItem);

        addMouseListener(new MouseAdapter() {

            @Override
            public void mouseReleased(MouseEvent e) {

                if (getExtendedState() != JFrame.MAXIMIZED_BOTH) {
                    maximizeMenuItem.setEnabled(true);
                }

                if (e.getButton() == MouseEvent.BUTTON3) {
                    popupMenu.show(e.getComponent(), e.getX(), e.getY());
                }
            }
        });
    }

    public static void main(String[] args) {

        EventQueue.invokeLater(() -> {

            var ex = new PopupMenuEx();
            ex.setVisible(true);
        });
    }
}
The example shows a popup menu with two commands. The first command maximizes the window, the second quits the application.
popupMenu = new JPopupMenu();
JPopupMenu creates a popup menu.
var maximizeMenuItem = new JMenuItem("Maximize");
maximizeMenuItem.addActionListener((e) -> {
    if (getExtendedState() != JFrame.MAXIMIZED_BOTH) {
        setExtendedState(JFrame.MAXIMIZED_BOTH);
        maximizeMenuItem.setEnabled(false);
    }
});
A popup menu consists of JMenuItems. This item will
maximize the frame. The getExtendedState() method determines
the state of the frame. The available states are: NORMAL,
ICONIFIED, MAXIMIZED_HORIZ, MAXIMIZED_VERT,
and MAXIMIZED_BOTH. Once the frame is maximized, we disable
the menu item with setEnabled() method.
popupMenu.add(quitMenuItem);
The menu item is inserted into the popup menu with add().
addMouseListener(new MouseAdapter() {

    @Override
    public void mouseReleased(MouseEvent e) {

        if (getExtendedState() != JFrame.MAXIMIZED_BOTH) {
            maximizeMenuItem.setEnabled(true);
        }

        if (e.getButton() == MouseEvent.BUTTON3) {
            popupMenu.show(e.getComponent(), e.getX(), e.getY());
        }
    }
});
The popup menu is shown where we clicked with the mouse button. The getButton()
method returns which, if any, of the mouse buttons has changed state. MouseEvent.BUTTON3
enables the popup menu only for the right mouse clicks. We enable the maximize
menu item once the window is not maximized.
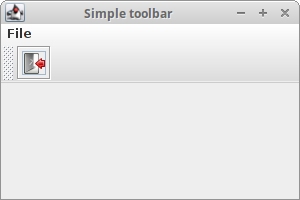
JToolBar
Menus group commands that we can use in an application. Toolbars provide a quick access
to the most frequently used commands. In Java Swing, the JToolBar
class creates a toolbar in an application.
package com.zetcode;

import javax.swing.ImageIcon;
import javax.swing.JButton;
import javax.swing.JFrame;
import javax.swing.JMenu;
import javax.swing.JMenuBar;
import javax.swing.JToolBar;
import java.awt.BorderLayout;
import java.awt.EventQueue;

public class ToolbarEx extends JFrame {

    public ToolbarEx() {

        initUI();
    }

    private void initUI() {

        createMenuBar();
        createToolBar();

        setTitle("Simple toolbar");
        setSize(300, 200);
        setLocationRelativeTo(null);
        setDefaultCloseOperation(EXIT_ON_CLOSE);
    }

    private void createMenuBar() {

        var menuBar = new JMenuBar();
        var fileMenu = new JMenu("File");

        menuBar.add(fileMenu);
        setJMenuBar(menuBar);
    }

    private void createToolBar() {

        var toolbar = new JToolBar();
        var icon = new ImageIcon("src/resources/exit2.png");

        var exitButton = new JButton(icon);
        toolbar.add(exitButton);

        exitButton.addActionListener((e) -> System.exit(0));

        add(toolbar, BorderLayout.NORTH);
    }

    public static void main(String[] args) {

        EventQueue.invokeLater(() -> {

            var ex = new ToolbarEx();
            ex.setVisible(true);
        });
    }
}
The example creates a toolbar with one exit button.
var toolbar = new JToolBar();
A toolbar is created with JToolBar.
var exitButton = new JButton(icon);
toolbar.add(exitButton);
We create a button and add it to the toolbar. A button inserted into a
toolbar is a regular JButton.
add(toolbar, BorderLayout.NORTH);
The toolbar is placed to the north area of the BorderLayout.
(BorderLayout is the default layout manager for the content pane of
a JFrame, JWindow, JDialog,
JInternalFrame, and JApplet.
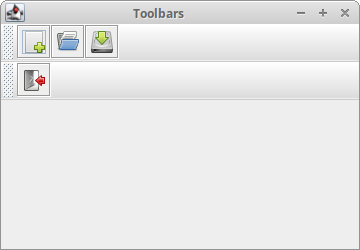
Swing toolbars
It is often necessary to display more that one toolbar on the window. The following example shows how to do it.
package com.zetcode;

import javax.swing.GroupLayout;
import javax.swing.ImageIcon;
import javax.swing.JButton;
import javax.swing.JComponent;
import javax.swing.JFrame;
import javax.swing.JToolBar;
import java.awt.EventQueue;

public class ToolbarsEx extends JFrame {

    public ToolbarsEx() {

        initUI();
    }

    private void initUI() {

        createToolBars();

        setTitle("Toolbars");
        setSize(360, 250);
        setLocationRelativeTo(null);
        setDefaultCloseOperation(EXIT_ON_CLOSE);
    }

    private void createToolBars() {

        var toolbar1 = new JToolBar();
        var toolbar2 = new JToolBar();

        var newIcon = new ImageIcon("src/resources/new2.png");
        var openIcon = new ImageIcon("src/resources/open2.png");
        var saveIcon = new ImageIcon("src/resources/save2.png");
        var exitIcon = new ImageIcon("src/resources/exit2.png");

        var newBtn = new JButton(newIcon);
        var openBtn = new JButton(openIcon);
        var saveBtn = new JButton(saveIcon);

        toolbar1.add(newBtn);
        toolbar1.add(openBtn);
        toolbar1.add(saveBtn);

        var exitBtn = new JButton(exitIcon);
        toolbar2.add(exitBtn);

        exitBtn.addActionListener((e) -> System.exit(0));

        createLayout(toolbar1, toolbar2);
    }

    private void createLayout(JComponent... arg) {

        var pane = getContentPane();
        var gl = new GroupLayout(pane);
        pane.setLayout(gl);

        gl.setHorizontalGroup(gl.createParallelGroup()
                .addComponent(arg[0], GroupLayout.DEFAULT_SIZE,
                        GroupLayout.DEFAULT_SIZE, Short.MAX_VALUE)
                .addComponent(arg[1], GroupLayout.DEFAULT_SIZE,
                        GroupLayout.DEFAULT_SIZE, Short.MAX_VALUE)
        );

        gl.setVerticalGroup(gl.createSequentialGroup()
                .addComponent(arg[0])
                .addComponent(arg[1])
        );
    }

    public static void main(String[] args) {

        EventQueue.invokeLater(() -> {

            var ex = new ToolbarsEx();
            ex.setVisible(true);
        });
    }
}
Two toolbars are displayed at the top of the window.
var toolbar1 = new JToolBar();
var toolbar2 = new JToolBar();
Two toolbar objects are created with JToolBar.
private void createLayout(JComponent... arg) {

    var pane = getContentPane();
    var gl = new GroupLayout(pane);
    pane.setLayout(gl);

    gl.setHorizontalGroup(gl.createParallelGroup()
            .addComponent(arg[0], GroupLayout.DEFAULT_SIZE,
                    GroupLayout.DEFAULT_SIZE, Short.MAX_VALUE)
            .addComponent(arg[1], GroupLayout.DEFAULT_SIZE,
                    GroupLayout.DEFAULT_SIZE, Short.MAX_VALUE)
    );

    gl.setVerticalGroup(gl.createSequentialGroup()
            .addComponent(arg[0])
            .addComponent(arg[1])
    );
}
GroupLayout manager is used to position the
toolbars at the top of the container.
In this part of the Java Swing tutorial, we have mentioned menus and
toolbars. We have used the following components: JMenuBar, JMenu,
JMenuItem, JSeparator, JCheckBoxMenuItem, JRadioButtonMenuItem,
ButtonGroup, JPopupMenu, and JToolBar.