Android ListView widget
last modified November 19, 2012
In this chapter of the Android development tutorial, we will explore
the ListView widget.
A ListView is a widget that shows items in a vertical scrolling
list. An Adapter object is used to fill the
ListView with data.
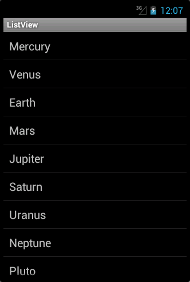
ListView widget I
In the example, we show a ListView widget with the names
of the planets of our solar system. We use an ArrayAdapter to
fill the ListView with data.
<?xml version="1.0" encoding="utf-8"?>
<LinearLayout xmlns:android="http://schemas.android.com/apk/res/android"
  android:orientation="vertical"
  android:layout_width="fill_parent"
  android:layout_height="fill_parent">

    <ListView
      android:id="@+id/lvId"
      android:layout_width="fill_parent"
      android:layout_height="fill_parent" />

</LinearLayout>
In the main.xml file we define one ListView widget.
<?xml version="1.0" encoding="utf-8"?>
<TextView xmlns:android="http://schemas.android.com/apk/res/android"
    android:layout_width="fill_parent"
    android:layout_height="fill_parent"
    android:padding="10dp"
    android:textSize="20sp">
</TextView>
In the row.xml file we define, how a list row will look like.
We will have one TextView in each row of a ListView. The
sp is a unit used for setting the font size.
<?xml version="1.0" encoding="utf-8"?>
<resources>
    <string name="app_name">ListView</string>
    <string-array name="planets">
        <item>Mercury</item>
        <item>Venus</item>
        <item>Earth</item>
        <item>Mars</item>
        <item>Jupiter</item>
        <item>Saturn</item>
        <item>Uranus</item>
        <item>Neptune</item>
        <item>Pluto</item>
    </string-array>
</resources>
The names of the planets are specified in the strings.xml file within
a string array attribute.
package com.zetcode.listview;

import android.app.Activity;
import android.os.Bundle;
import android.widget.ArrayAdapter;
import android.widget.ListView;

public class MainActivity extends Activity
{
    private ListView lv;
    private ArrayAdapter<String> la;

    @Override
    public void onCreate(Bundle savedInstanceState)
    {
        super.onCreate(savedInstanceState);
        setContentView(R.layout.main);

        setupUI();
    }

    public void setupUI()
    {
        lv = (ListView) findViewById(R.id.lvId);
        String[] planets = getResources().getStringArray(R.array.planets);
        lv.setAdapter(new ArrayAdapter<String>(this, R.layout.row, planets));
    }
}
This is the MainActivity.java source file.
lv = (ListView) findViewById(R.id.lvId);
We get the reference to the ListView widget.
String[] planets = getResources().getStringArray(R.array.planets);
This code line retrieves the names of the planets from the resource file.
lv.setAdapter(new ArrayAdapter<String>(this, R.layout.row, planets));
An ArrayAdapter is created and set to the ListView.
ListView widget II
A ListActivity is a special activity that holds a ListView object.
ListView is a common widget and it typically takes the whole screen. Therefore
a special activity was created. In the example, the manifest file is not modified.
We will also not need the main.xml layout file.
<?xml version="1.0" encoding="utf-8"?>
<TextView xmlns:android="http://schemas.android.com/apk/res/android"
    android:layout_width="fill_parent"
    android:layout_height="fill_parent"
    android:padding="10dp"
    android:textSize="20sp">
</TextView>
In the row.xml file we define one TextView in each
row of a ListView.
<?xml version="1.0" encoding="utf-8"?>
<resources>
    <string name="app_name">ListView2</string>
</resources>
This is the strings.xml resource file.
package com.zetcode.listview2;

import android.app.ListActivity;
import android.os.Bundle;
import android.view.View;
import android.widget.ArrayAdapter;
import android.widget.AdapterView;
import android.widget.AdapterView.OnItemClickListener;
import android.widget.AdapterView.OnItemSelectedListener;
import android.widget.ListView;
import android.widget.TextView;

public class MainActivity extends ListActivity
     implements OnItemClickListener, OnItemSelectedListener
{
    @Override
    public void onCreate(Bundle savedInstanceState)
    {
        super.onCreate(savedInstanceState);
        setupUI();
    }

    public void setupUI()
    {
        ArrayAdapter<String> la = new ArrayAdapter<String>(this, R.layout.row);
        la.add("Mercury");
        la.add("Venus");
        la.add("Earth");
        la.add("Mars");
        la.add("Jupiter");
        la.add("Saturn");
        la.add("Uranus");
        la.add("Neptune");
        la.add("Pluto");

        setListAdapter(la);

        ListView lv = getListView();
        lv.setOnItemClickListener(this);
        lv.setOnItemSelectedListener(this);
    }

    public void onItemClick(AdapterView<?> parent, View view,
        int position, long id)
    {
        String planet = ((TextView) view).getText().toString();
        setTitle(planet);
    }

    public void onItemSelected(AdapterView<?> parent, View view,
        int position, long id)
    {
        String planet = ((TextView) view).getText().toString();
        setTitle(planet);
    }

    public void onNothingSelected(AdapterView<?> parent)
    {
        // not implemented
    }
}
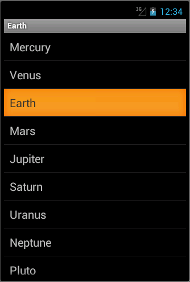
We programmatically create the items of the ListView. We react to click and select
events of the ListView. The planet that we select or click on will be shown in
the titlebar.
public class MainActivity extends ListActivity
     implements OnItemClickListener, OnItemSelectedListener
The MainActivityextends the ListActivity and implements two listeners.
By implementing these two listeners, we must implement three abstract methods that
are associated with these listeners.
@Override
public void onCreate(Bundle savedInstanceState)
{
    super.onCreate(savedInstanceState);
    setupUI();
}
In the onCreate() method we do not call the setContentView() method.
The ListView widget of the ListActivity will take up the whole screen.
ArrayAdapter<String> la = new ArrayAdapter<String>(this, R.layout.row);
la.add("Mercury");
la.add("Venus");
la.add("Earth");
...
We create an instance of the ArrayAdapter. We add names of the planets
to the adapter.
setListAdapter(la);
Sets the adapter for the associated ListView object.
ListView lv = getListView();
lv.setOnItemClickListener(this);
lv.setOnItemSelectedListener(this);
From the ListActivity we get the ListView widget. The
two listeners are set for the ListView widget.
public void onItemClick(AdapterView<?> parent, View view,
    int position, long id)
{
    String planet = ((TextView) view).getText().toString();
    setTitle(planet);
}
Implementing the OnItemClickListener, we have to define the
onItemClick() method. We get the planet name from the
TextView of the clicked row and set it to the titlebar.
public void onItemSelected(AdapterView<?> parent, View view,
    int position, long id)
{
    String planet = ((TextView) view).getText().toString();
    setTitle(planet);
}

public void onNothingSelected(AdapterView<?> parent)
{
    // not implemented
}
After implementing the OnItemSelectedListener we have to
define two abstract methods. The first method sets the currently selected
planet to the titlebar. The second method is not implemented.
In this chapter of the Android development tutorial, we have mentioned
the ListView widget.