Advanced widgets in wxPython
last modified January 10, 2023
In this chapter we talk about the following advanced widgets: wx.ListBox,
wx.html.HtmlWindow, wx.ListCtrl.
wxPython has several well known advanced widgets. For example a tree widget, an HTML window, a grid widget, a listbox widget, a list widget, or an editor with advanced styling capabilities.
wx.ListBox widget
wx.ListBox is used for displaying and working with a
list of items. A wx.ListBox can be created in two different states:
in a single selection state or a multiple selection state. The single
selection state is the default state.
There are two significant events in wx.ListBox. The first one
is the wx.EVT_COMMAND_LISTBOX_SELECTED event. This event is
generated when we select an item in a wx.ListBox. The second
one is the wx.EVT_COMMAND_LISTBOX_DOUBLE_CLICKED event. It is
generated when we double click an item in a wx.ListBox.
The elements are numbered from zero. Scrollbars are displayed automatically
if needed.
#!/usr/bin/env python

"""
ZetCode wxPython tutorial

In this example, we create a wx.ListBox widget.

author: Jan Bodnar
website: www.zetcode.com
last modified: July 2020
"""

import wx

class Example(wx.Frame):

    def __init__(self, *args, **kw):
        super(Example, self).__init__(*args, **kw)

        self.InitUI()

    def InitUI(self):

        panel = wx.Panel(self)
        hbox = wx.BoxSizer(wx.HORIZONTAL)

        self.listbox = wx.ListBox(panel)
        hbox.Add(self.listbox, wx.ID_ANY, wx.EXPAND | wx.ALL, 20)

        btnPanel = wx.Panel(panel)
        vbox = wx.BoxSizer(wx.VERTICAL)
        newBtn = wx.Button(btnPanel, wx.ID_ANY, 'New', size=(90, 30))
        renBtn = wx.Button(btnPanel, wx.ID_ANY, 'Rename', size=(90, 30))
        delBtn = wx.Button(btnPanel, wx.ID_ANY, 'Delete', size=(90, 30))
        clrBtn = wx.Button(btnPanel, wx.ID_ANY, 'Clear', size=(90, 30))

        self.Bind(wx.EVT_BUTTON, self.NewItem, id=newBtn.GetId())
        self.Bind(wx.EVT_BUTTON, self.OnRename, id=renBtn.GetId())
        self.Bind(wx.EVT_BUTTON, self.OnDelete, id=delBtn.GetId())
        self.Bind(wx.EVT_BUTTON, self.OnClear, id=clrBtn.GetId())
        self.Bind(wx.EVT_LISTBOX_DCLICK, self.OnRename)

        vbox.Add((-1, 20))
        vbox.Add(newBtn)
        vbox.Add(renBtn, 0, wx.TOP, 5)
        vbox.Add(delBtn, 0, wx.TOP, 5)
        vbox.Add(clrBtn, 0, wx.TOP, 5)

        btnPanel.SetSizer(vbox)
        hbox.Add(btnPanel, 0.6, wx.EXPAND | wx.RIGHT, 20)
        panel.SetSizer(hbox)

        self.SetTitle('wx.ListBox')
        self.Centre()

    def NewItem(self, event):

        text = wx.GetTextFromUser('Enter a new item', 'Insert dialog')
        if text != '':
            self.listbox.Append(text)

    def OnRename(self, event):

        sel = self.listbox.GetSelection()
        text = self.listbox.GetString(sel)
        renamed = wx.GetTextFromUser('Rename item', 'Rename dialog', text)

        if renamed != '':
            self.listbox.Delete(sel)
            item_id = self.listbox.Insert(renamed, sel)
            self.listbox.SetSelection(item_id)

    def OnDelete(self, event):

        sel = self.listbox.GetSelection()
        if sel != -1:
            self.listbox.Delete(sel)

    def OnClear(self, event):
        self.listbox.Clear()


def main():

    app = wx.App()
    ex = Example(None)
    ex.Show()
    app.MainLoop()


if __name__ == '__main__':
    main()
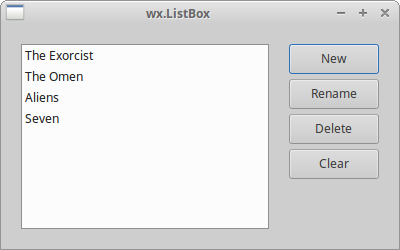
The example shows how to add, modify, and delete items from a
wx.ListBox.
self.listbox = wx.ListBox(panel)
hbox.Add(self.listbox, wx.ID_ANY, wx.EXPAND | wx.ALL, 20)
We create an empty wx.ListBox. We put a 20px border
around the listbox.
self.Bind(wx.EVT_LISTBOX_DCLICK, self.OnRename)
We bind a wx.EVT_COMMAND_LISTBOX_DOUBLE_CLICKED event type with the
OnRename() method using the wx.EVT_LISTBOX_DCLICK event binder.
This way we show a rename dialog if we double click on a specific element
in the listbox.
def NewItem(self, event):

    text = wx.GetTextFromUser('Enter a new item', 'Insert dialog')
    if text != '':
        self.listbox.Append(text)
We call the NewItem() method by clicking on the New button. This
method shows a wx.TextEntryDialog using the wrapper
wx.GetTextFromUser() method.
The text that we enter is returned to the text variable. If the text
is not empty, we append it to the listbox with the Append() method.
if renamed != '':
    self.listbox.Delete(sel)
    item_id = self.listbox.Insert(renamed, sel)
    self.listbox.SetSelection(item_id)
We rename an item by deleting it and inserting a new item at the same position. We also set the selection back to the modified item.
def OnDelete(self, event):

    sel = self.listbox.GetSelection()
    if sel != -1:
        self.listbox.Delete(sel)
To delete an item, we find the index of the selected item by calling the
GetSelection() method. Then we delete the item with the
Delete() method. The parameter to the Delete() method
is the selected index.
def OnClear(self, event):
    self.listbox.Clear()
The easiest thing is to clear the whole listbox. We simply call the
Clear() method.
wx.html.HtmlWindow widget
The wx.html.HtmlWindow widget displays HTML pages. It is not
a full-fledged browser. We can do some interesting things with
wx.html.HtmlWindow widget.
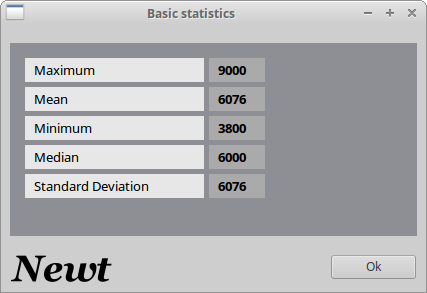
For example in the following program we create a window that displays basic statistics.
<!DOCTYPE html>
<html>
<body bgcolor="#8e8e95">
<table cellspacing="5" border="0" width="250">
<tr width="200" align="left">
<td bgcolor="#e7e7e7"> Maximum</td>
<td bgcolor="#aaaaaa"> <b>9000</b></td>
</tr>
<tr align="left">
<td bgcolor="#e7e7e7"> Mean</td>
<td bgcolor="#aaaaaa"> <b>6076</b></td>
</tr>
<tr align="left">
<td bgcolor="#e7e7e7"> Minimum</td>
<td bgcolor="#aaaaaa"> <b>3800</b></td>
</tr>
<tr align="left">
<td bgcolor="#e7e7e7"> Median</td>
<td bgcolor="#aaaaaa"> <b>6000</b></td>
</tr>
<tr align="left">
<td bgcolor="#e7e7e7"> Standard Deviation</td>
<td bgcolor="#aaaaaa"> <b>6076</b></td>
</tr>
</table>
</body>
</html>
This is the HTML page to be displayed.
#!/usr/bin/env python

"""
ZetCode wxPython tutorial

In this example, we create a wx.html.HtmlWindow widget.

author: Jan Bodnar
website: www.zetcode.com
last modified: July 2020
"""

import wx
import wx.html

class Example(wx.Frame):

    def __init__(self, *args, **kw):
        super(Example, self).__init__(*args, **kw)

        self.InitUI()

    def InitUI(self):

        panel = wx.Panel(self)

        vbox = wx.BoxSizer(wx.VERTICAL)
        hbox = wx.BoxSizer(wx.HORIZONTAL)

        htmlwin = wx.html.HtmlWindow(panel, wx.ID_ANY, style=wx.NO_BORDER)
        htmlwin.SetStandardFonts()
        htmlwin.LoadPage("page.html")

        vbox.Add((-1, 10), 0)
        vbox.Add(htmlwin, 1, wx.EXPAND | wx.ALL, 9)

        bitmap = wx.StaticBitmap(panel, wx.ID_ANY, wx.Bitmap('newt.png'))
        hbox.Add(bitmap, 0, wx.LEFT | wx.BOTTOM | wx.TOP, 10)
        btnOk = wx.Button(panel, wx.ID_ANY, 'Ok')

        self.Bind(wx.EVT_BUTTON, self.OnClose, id=btnOk.GetId())

        hbox.Add((100, -1), 1, wx.EXPAND | wx.ALIGN_RIGHT)
        hbox.Add(btnOk, flag=wx.TOP | wx.BOTTOM | wx.RIGHT, border=10)
        vbox.Add(hbox, 0, wx.EXPAND)

        panel.SetSizer(vbox)

        self.SetTitle('Basic statistics')
        self.Centre()

    def OnClose(self, event):
        self.Close()


def main():

    app = wx.App()
    ex = Example(None)
    ex.Show()
    app.MainLoop()


if __name__ == '__main__':
    main()
The example dispays an HTML file in the wx.html.HtmlWindow widget.
htmlwin = wx.html.HtmlWindow(panel, wx.ID_ANY, style=wx.NO_BORDER)
htmlwin.SetStandardFonts()
htmlwin.LoadPage("page.html")
The wx.html.HtmlWindow is created. The HTML file is loaded with
the LoadPage() method.
Help window
We can use wx.html.HtmlWindow to provide help in our application. We can
create a standalone window or we can create a window that is going to be a part
of the application. The following script will create a help window using the
latter idea.
#!/usr/bin/env python

"""
ZetCode wxPython tutorial

In this example, we create a help window window
with wx.html.HtmlWindow.

author: Jan Bodnar
website: www.zetcode.com
last modified: July 2020
"""

import wx
import wx.html as html

class Example(wx.Frame):

    def __init__(self, *args, **kw):
        super(Example, self).__init__(*args, **kw)

        self.InitUI()

    def InitUI(self):

        toolbar = self.CreateToolBar()
        toolbar.AddTool(1, 'Exit', wx.Bitmap('exit.png'))
        toolbar.AddTool(2, 'Help', wx.Bitmap('help.png'))
        toolbar.Realize()

        self.splitter = wx.SplitterWindow(self)
        self.panelLeft = wx.Panel(self.splitter, wx.ID_ANY, style=wx.BORDER_SUNKEN)

        self.panelRight = wx.Panel(self.splitter)
        vbox2 = wx.BoxSizer(wx.VERTICAL)
        header = wx.Panel(self.panelRight, wx.ID_ANY)

        header.SetBackgroundColour('#6f6a59')
        header.SetForegroundColour('white')

        hbox = wx.BoxSizer(wx.HORIZONTAL)

        st = wx.StaticText(header, wx.ID_ANY, 'Help')
        font = st.GetFont()
        font.SetFamily(wx.FONTFAMILY_ROMAN)
        font.SetPointSize(11)
        st.SetFont(font)

        hbox.Add(st, 1, wx.TOP | wx.BOTTOM | wx.LEFT, 8)

        closeBtn = wx.BitmapButton(header, wx.ID_ANY, wx.Bitmap('closebutton.png',
              wx.BITMAP_TYPE_PNG), style=wx.NO_BORDER)
        closeBtn.SetBackgroundColour('#6f6a59')

        hbox.Add(closeBtn, 0, wx.TOP|wx.BOTTOM, 8)
        header.SetSizer(hbox)

        vbox2.Add(header, 0, wx.EXPAND)

        helpWin = html.HtmlWindow(self.panelRight, style=wx.NO_BORDER)
        helpWin.LoadPage('help.html')

        vbox2.Add(helpWin, 1, wx.EXPAND)

        self.panelRight.SetSizer(vbox2)
        self.panelLeft.SetFocus()

        self.splitter.SplitVertically(self.panelLeft, self.panelRight)
        self.splitter.Unsplit()

        self.Bind(wx.EVT_BUTTON, self.CloseHelp, id=closeBtn.GetId())
        self.Bind(wx.EVT_TOOL, self.OnClose, id=1)
        self.Bind(wx.EVT_TOOL, self.OnHelp, id=2)

        self.panelLeft.Bind(wx.EVT_KEY_DOWN, self.OnKeyPressed)
        self.panelLeft.SetFocus()

        self.CreateStatusBar()

        self.SetTitle('Help')
        self.Centre()

    def OnClose(self, e):
        self.Close()

    def OnHelp(self, e):

        self.splitter.SplitVertically(self.panelLeft, self.panelRight)
        self.panelLeft.SetFocus()

    def CloseHelp(self, e):

        self.splitter.Unsplit()
        self.panelLeft.SetFocus()

    def OnKeyPressed(self, e):

        keycode = e.GetKeyCode()
        print(keycode)

        if keycode == wx.WXK_F1:

            self.splitter.SplitVertically(self.panelLeft, self.panelRight)
            self.panelLeft.SetFocus()


def main():

    app = wx.App()
    ex = Example(None)
    ex.Show()
    app.MainLoop()


if __name__ == '__main__':
    main()
The help window is hidden in the beginning. We can show it by clicking on the Help button on the toolbar or by pressing F1. The help window appears on the right side of the application. To hide the help window, we click on the Close button.
self.splitter.SplitVertically(self.panelLeft, self.panelRight)
self.splitter.Unsplit()
We create left a right panels and split them vertically. After that, we
call the Unsplit() method. By default the method hides the right
or bottom panes.
We divide the right panel into two parts. The header and the body of the
panel. The header is an adjusted wx.Panel. The header consists of a
static text and a bitmap button. We put wx.html.Window into the
body of the panel.
closeBtn = wx.BitmapButton(header, wx.ID_ANY, wx.Bitmap('closebutton.png',
      wx.BITMAP_TYPE_PNG), style=wx.NO_BORDER)
closeBtn.SetBackgroundColour('#6f6a59')
The bitmap button style is set to wx.NO_BORDER. The background colour
is set to the colour of the header panel. This is done in order to make the
button appear as a part of the header.
helpWin = html.HtmlWindow(self.panelRight, style=wx.NO_BORDER)
helpWin.LoadPage('help.html')
We create a wx.html.HtmlWindow widget on the right panel. We have
our HTML code in a separate file. This time we call the LoadPage()
method to obtain the HTML code.
self.panelLeft.Bind(wx.EVT_KEY_DOWN, self.OnKeyPressed)
self.panelLeft.SetFocus()
We set focus on the left panel. We can launch the help window with the F1 key. In order to control a window with a keyboard, it must have the focus. If we did not set the focus, we would have to first click on the panel and only then we could launch the help window with the F1 key press.
def OnHelp(self, e):

    self.splitter.SplitVertically(self.panelLeft, self.panelRight)
    self.panelLeft.SetFocus()
To show the help window, we call the OnHelp() method. It splits the
two panels vertically. We must not forget to
set the focus again, because the initial focus is lost by splitting.
The following is the HTML file that we load in our application.
<!DOCTYPE html>
<html>

<body bgcolor="#ababab">
<h4>Table of Contents</h4>

<ul>
<li><a href="#basic">Basic statistics</a></li>
<li><a href="#advanced">Advanced statistics</a></li>
<li><a href="#intro">Introducing Newt</a></li>
<li><a href="#charts">Working with charts</a></li>
<li><a href="#pred">Predicting values</a></li>
<li><a href="#neural">Neural networks</a></li>
<li><a href="#glos">Glossary</a></li>
</ul>

<p>
<a name="basic">
<h6>Basic Statistics</h6>
Overview of elementary concepts in statistics.
Variables. Correlation. Measurement scales. Statistical significance.
Distributions. Normality assumption.
</a>
</p>

<p>
<a name="advanced">
<h6>Advanced Statistics</h6>
Overview of advanced concepts in statistics. Anova. Linear regression.
Estimation and  hypothesis testing.
Error terms.
</a>
</p>

<p>
<a name="intro">
<h6>Introducing Newt</h6>
Introducing the basic functionality of the Newt application. Creating sheets.
Charts. Menus and Toolbars. Importing data. Saving data in various formats.
Exporting data. Shortcuts. List of methods.
</a>
</p>

<p>
<a name="charts">
<h6>Charts</h6>
Working with charts. 2D charts. 3D charts. Bar, line, box, pie, range charts.
Scatterplots. Histograms.
</a>
</p>

<p>
<a name="pred">
<h6>Predicting values</h6>
Time series and forecasting. Trend Analysis. Seasonality. Moving averages.
Univariate methods. Multivariate methods. Holt-Winters smoothing.
Exponential smoothing. ARIMA. Fourier analysis.
</a>
</p>

<p>
<a name="neural">
<h6>Neural networks</h6>
Overview of neural networks. Biology behind neural networks.
Basic artificial Model. Training. Preprocessing. Postprocessing.
Types of neural networks.
</a>
</p>

<p>
<a name="glos">
<h6>Glossary</h6>
Terms and definitions in statistics.
</a>
</p>

</body>
</html>
The HTML file contains the table of contents of the help of the application.

wx.ListCtrl widget
A wx.ListCtrl is a graphical representation of a list of items. A
wx.ListBox can only have one column. wx.ListCtrl can have
more than one column.
wx.ListCtrl is a very common and useful widget.
For example a file manager uses a wx.ListCtrl to display
directories and files on the file system. A cd burner application
displays files to be burned inside a wx.ListCtrl.
A wx.ListCtrl can be used in three different formats. In a list view,
report view or a icon view. These formats are controled by the wx.ListCtrl
window styles. wx.LC_REPORT, wx.LC_LIST and wx.LC_ICON.
wx.ListCtrl styles
- wx.LC_LIST
- wx.LC_REPORT
- wx.LC_VIRTUAL
- wx.LC_ICON
- wx.LC_SMALL_ICON
- wx.LC_ALIGN_LEFT
- wx.LC_EDIT_LABELS
- wx.LC_NO_HEADER
- wx.LC_SORT_ASCENDING
- wx.LC_SORT_DESCENDING
- wx.LC_HRULES
- wx.LC_VRULES
Simple example
The first example presents some basic functionality of the wx.ListCtrl.
#!/usr/bin/env python

"""
ZetCode wxPython tutorial

In this example, we create a simple
wx.ListCtrl widget.

author: Jan Bodnar
website: www.zetcode.com
last modified: July 2020
"""

import wx

data = [('Jessica Alba', 'Pomona', '1981'), ('Sigourney Weaver', 'New York', '1949'),
  ('Angelina Jolie', 'los angeles', '1975'), ('Natalie Portman', 'Jerusalem', '1981'),
  ('Rachel Weiss', 'London', '1971'), ('Scarlett Johansson', 'New York', '1984' )]


class Example(wx.Frame):

    def __init__(self, *args, **kw):
        super(Example, self).__init__(*args, **kw)

        self.InitUI()

    def InitUI(self):

        hbox = wx.BoxSizer(wx.HORIZONTAL)
        panel = wx.Panel(self)

        self.list = wx.ListCtrl(panel, wx.ID_ANY, style=wx.LC_REPORT)
        self.list.InsertColumn(0, 'name', width=140)
        self.list.InsertColumn(1, 'place', width=130)
        self.list.InsertColumn(2, 'year', wx.LIST_FORMAT_RIGHT, 90)

        idx = 0

        for i in data:

            index = self.list.InsertItem(idx, i[0])
            self.list.SetItem(index, 1, i[1])
            self.list.SetItem(index, 2, i[2])
            idx += 1

        hbox.Add(self.list, 1, wx.EXPAND)
        panel.SetSizer(hbox)

        self.SetTitle('Actresses')
        self.Centre()


def main():

    app = wx.App()
    ex = Example(None)
    ex.Show()
    app.MainLoop()


if __name__ == '__main__':
    main()
The code example displays data about actresses in a wx.ListCtrl.
self.list = wx.ListCtrl(panel, wx.ID_ANY, style=wx.LC_REPORT)
We create a wx.ListCtrl with a wx.LC_REPORT style.
self.list.InsertColumn(0, 'name', width=140)
self.list.InsertColumn(1, 'place', width=130)
self.list.InsertColumn(2, 'year', wx.LIST_FORMAT_RIGHT, 90)
We insert three columns. We can specify the width of the column and
the format of the column. The default format is wx.LIST_FORMAT_LEFT.
idx = 0

for i in data:

    index = self.list.InsertItem(idx, i[0])
    self.list.SetItem(index, 1, i[1])
    self.list.SetItem(index, 2, i[2])
    idx += 1
We insert data into the wx.ListCtrl using two methods.
Each row begins with a InsertItem() method. The first
parameter of the method specifies the row number. The method
returns the row index. The SetItem() method adds data to the
consecutive columns of the current row.
Mixins
Mixins are classes that further enhance the functionality of a
wx.ListCtrl. They are located in wx.lib.mixins.listctrl
module. In order to use them, we have to inherit from these classes.
There are six mixins:
- wx.ColumnSorterMixin
- wx.ListCtrlAutoWidthMixin
- wx.ListCtrlSelectionManagerMix
- wx.TextEditMixin
- wx.CheckListCtrlMixin
- wx.ListRowHighlighter
wx.ColumnSorterMixin is a mixin that enables sorting of columns
in a report view. wx.ListCtrlAutoWidthMixin class automatically
resizes the last column to the end of the wx.ListCtrl. By default,
the last column does not take the remaining space. See the previous
example. wx.ListCtrlSelectionManagerMix defines platform
independent selection policy. wx.TextEditMixin enables text to be
edited. wx.CheckListCtrlMixin adds a check box to each row. This
way we can control rows. We can set every row to be checked or unchecked.
wx.ListRowHighlighter handles automatic background highlighting of
alternate rows in the a wx.ListCtrl.
wx.lib.mixins.listctrl.ListCtrlAutoWidthMixin
The following code shows how we can use wx.lib.mixins.listctrl.ListCtrlAutoWidthMixin
#!/usr/bin/env python

"""
ZetCode wxPython tutorial

In this example, we use wx.lib.mixins.listctrl.ListCtrlAutoWidthMixin
with a wx.ListBox.

author: Jan Bodnar
website: www.zetcode.com
last modified: July 2020
"""

import wx
import wx.lib.mixins.listctrl

data = [('Jessica Alba', 'Pomona', '1981'), ('Sigourney Weaver', 'New York', '1949'),
  ('Angelina Jolie', 'Los Angeles', '1975'), ('Natalie Portman', 'Jerusalem', '1981'),
  ('Rachel Weiss', 'London', '1971'), ('Scarlett Johansson', 'New York', '1984')]


class AutoWidthListCtrl(wx.ListCtrl, wx.lib.mixins.listctrl.ListCtrlAutoWidthMixin):

    def __init__(self, parent, *args, **kw):
        wx.ListCtrl.__init__(self, parent, wx.ID_ANY, style=wx.LC_REPORT)
        wx.lib.mixins.listctrl.ListCtrlAutoWidthMixin.__init__(self)


class Example(wx.Frame):

    def __init__(self, *args, **kw):
        super(Example, self).__init__(*args, **kw)

        self.InitUI()

    def InitUI(self):

        hbox = wx.BoxSizer(wx.HORIZONTAL)

        panel = wx.Panel(self)

        self.list = AutoWidthListCtrl(panel)
        self.list.InsertColumn(0, 'name', width=140)
        self.list.InsertColumn(1, 'place', width=130)
        self.list.InsertColumn(2, 'year', wx.LIST_FORMAT_RIGHT, 90)

        idx = 0

        for i in data:

            index = self.list.InsertItem(idx, i[0])
            self.list.SetItem(index, 1, i[1])
            self.list.SetItem(index, 2, i[2])
            idx += 1

        hbox.Add(self.list, 1, wx.EXPAND)
        panel.SetSizer(hbox)

        self.SetTitle('Actresses')
        self.Centre()


def main():

    app = wx.App()
    ex = Example(None)
    ex.Show()
    app.MainLoop()


if __name__ == '__main__':
    main()
We change the previous example a bit.
import wx.lib.mixins.listctrl
Here we import the mixin module.
class AutoWidthListCtrl(wx.ListCtrl, wx.lib.mixins.listctrl.ListCtrlAutoWidthMixin):

    def __init__(self, parent, *args, **kw):
        wx.ListCtrl.__init__(self, parent, wx.ID_ANY, style=wx.LC_REPORT)
        wx.lib.mixins.listctrl.ListCtrlAutoWidthMixin.__init__(self)
We create a new AutoWidthListCtrl class. This class inherits
from wx.ListCtrl and wx.lib.mixins.listctrl.ListCtrlAutoWidthMixin.
This is called multiple inheritance. The last column will automatically
resize to take up the remaining width of a wx.ListCtrl.
wx.lib.mixins.listctrl.ColumnSorterMixin
The following example creates sortable columns. If we click on the column header, the corresponding rows in a column are sorted.
#!/usr/bin/env python

"""
ZetCode wxPython tutorial

In this example, we create sortable columns with
wx.lib.mixins.listctrl.ColumnSorterMixin

author: Jan Bodnar
website: www.zetcode.com
last modified: July 2020
"""

import wx
import wx.lib.mixins.listctrl

actresses = {
1 : ('Jessica Alba', 'Pomona', '1981'),
2 : ('Sigourney Weaver', 'New York', '1949'),
3 : ('Angelina Jolie', 'Los Angeles', '1975'),
4 : ('Natalie Portman', 'Jerusalem', '1981'),
5 : ('Rachel Weiss', 'London', '1971'),
6 : ('Scarlett Johansson', 'New York', '1984')
}


class SortedListCtrl(wx.ListCtrl, wx.lib.mixins.listctrl.ColumnSorterMixin):

    def __init__(self, parent):

        wx.ListCtrl.__init__(self, parent, wx.ID_ANY, style=wx.LC_REPORT)
        wx.lib.mixins.listctrl.ColumnSorterMixin.__init__(self, len(actresses))
        self.itemDataMap = actresses

    def GetListCtrl(self):
        return self


class Example(wx.Frame):

    def __init__(self, *args, **kw):
        super(Example, self).__init__(*args, **kw)

        self.InitUI()

    def InitUI(self):

        hbox = wx.BoxSizer(wx.HORIZONTAL)
        panel = wx.Panel(self)

        self.list = SortedListCtrl(panel)
        self.list.InsertColumn(0, 'name', width=140)
        self.list.InsertColumn(1, 'place', width=130)
        self.list.InsertColumn(2, 'year', wx.LIST_FORMAT_RIGHT, 90)

        items = actresses.items()

        idx = 0

        for key, data in items:

            index = self.list.InsertItem(idx, data[0])
            self.list.SetItem(index, 1, data[1])
            self.list.SetItem(index, 2, data[2])
            self.list.SetItemData(index, key)
            idx += 1

        hbox.Add(self.list, 1, wx.EXPAND)
        panel.SetSizer(hbox)

        self.SetTitle('Actresses')
        self.Centre()


def main():

    app = wx.App()
    ex = Example(None)
    ex.Show()
    app.MainLoop()


if __name__ == '__main__':
    main()
We will again use the example with actresses.
wx.lib.mixins.listctrl.ColumnSorterMixin.__init__(self, len(actresses))
The wx.lib.mixins.listctrl.ColumnSorterMixin accepts one argument:
the number of columns to be sorted.
self.itemDataMap = actresses
We must map our data to be displayed in a list control to the
itemDataMap attribute. The data must be in a dictionary data type.
def GetListCtrl(self):
    return self
We must create a GetListCtrl() method. This method returns the
wx.ListCtrl widget that is going to be sorted.
self.list.SetItemData(index, key)
We must assosiate each row with a special index. This is done with the
SetItemData method.
wx.lib.mixins.listctrl.CheckListCtrl
A check box can be placed inside a list control.
In wxPython, we can use wx.lib.mixins.listctrl.CheckListCtrl.
#!/usr/bin/env python

"""
ZetCode wxPython tutorial

In this example, we create a check list control widget.

author: Jan Bodnar
website: www.zetcode.com
last modified: July 2020
"""

import wx
from wx.lib.mixins.listctrl import CheckListCtrlMixin, ListCtrlAutoWidthMixin

packages = [('abiword', '5.8M', 'base'), ('adie', '145k', 'base'),
    ('airsnort', '71k', 'base'), ('ara', '717k', 'base'), ('arc', '139k', 'base'),
    ('asc', '5.8M', 'base'), ('ascii', '74k', 'base'), ('ash', '74k', 'base')]

class CheckListCtrl(wx.ListCtrl, CheckListCtrlMixin, ListCtrlAutoWidthMixin):

    def __init__(self, parent):
        wx.ListCtrl.__init__(self, parent, wx.ID_ANY, style=wx.LC_REPORT |
                wx.SUNKEN_BORDER)
        CheckListCtrlMixin.__init__(self)
        ListCtrlAutoWidthMixin.__init__(self)


class Example(wx.Frame):

    def __init__(self, *args, **kw):
        super(Example, self).__init__(*args, **kw)

        panel = wx.Panel(self)

        vbox = wx.BoxSizer(wx.VERTICAL)
        hbox = wx.BoxSizer(wx.HORIZONTAL)

        leftPanel = wx.Panel(panel)
        rightPanel = wx.Panel(panel)

        self.log = wx.TextCtrl(rightPanel, style=wx.TE_MULTILINE|wx.TE_READONLY)
        self.list = CheckListCtrl(rightPanel)
        self.list.InsertColumn(0, 'Package', width=140)
        self.list.InsertColumn(1, 'Size')
        self.list.InsertColumn(2, 'Repository')

        idx = 0

        for i in packages:

            index = self.list.InsertItem(idx, i[0])
            self.list.SetItem(index, 1, i[1])
            self.list.SetItem(index, 2, i[2])
            idx += 1

        vbox2 = wx.BoxSizer(wx.VERTICAL)

        selBtn = wx.Button(leftPanel, label='Select All')
        desBtn = wx.Button(leftPanel, label='Deselect All')
        appBtn = wx.Button(leftPanel, label='Apply')

        self.Bind(wx.EVT_BUTTON, self.OnSelectAll, id=selBtn.GetId())
        self.Bind(wx.EVT_BUTTON, self.OnDeselectAll, id=desBtn.GetId())
        self.Bind(wx.EVT_BUTTON, self.OnApply, id=appBtn.GetId())

        vbox2.Add(selBtn, 0, wx.TOP|wx.BOTTOM, 5)
        vbox2.Add(desBtn, 0, wx.BOTTOM, 5)
        vbox2.Add(appBtn)

        leftPanel.SetSizer(vbox2)

        vbox.Add(self.list, 4, wx.EXPAND | wx.TOP, 3)
        vbox.Add((-1, 10))
        vbox.Add(self.log, 1, wx.EXPAND)
        vbox.Add((-1, 10))

        rightPanel.SetSizer(vbox)

        hbox.Add(leftPanel, 0, wx.EXPAND | wx.RIGHT, 5)
        hbox.Add(rightPanel, 1, wx.EXPAND)
        hbox.Add((3, -1))

        panel.SetSizer(hbox)

        self.SetTitle('Repository')
        self.Centre()

    def OnSelectAll(self, event):

        num = self.list.GetItemCount()
        for i in range(num):
            self.list.CheckItem(i)

    def OnDeselectAll(self, event):

        num = self.list.GetItemCount()
        for i in range(num):
            self.list.CheckItem(i, False)

    def OnApply(self, event):

        num = self.list.GetItemCount()

        for i in range(num):

            if i == 0: self.log.Clear()

            if self.list.IsChecked(i):
                self.log.AppendText(self.list.GetItemText(i) + '\n')


def main():

    app = wx.App()
    ex = Example(None)
    ex.Show()
    app.MainLoop()


if __name__ == '__main__':
    main()
The example creates a repository UI with a wx.lib.mixins.listctrl.CheckListCtrl.
class CheckListCtrl(wx.ListCtrl, CheckListCtrlMixin, ListCtrlAutoWidthMixin):

    def __init__(self, parent):
        wx.ListCtrl.__init__(self, parent, wx.ID_ANY, style=wx.LC_REPORT |
                wx.SUNKEN_BORDER)
        CheckListCtrlMixin.__init__(self)
        ListCtrlAutoWidthMixin.__init__(self)
We inherit from three different classes.
def OnSelectAll(self, event):

    num = self.list.GetItemCount()

    for i in range(num):
        self.list.CheckItem(i)
The OnSelectAll() method selects all check boxes.
The GetItemCount() determines the number of items and the
CheckItem() method marks the current check box.

In this part of the wxPython tutorial, we covered several advanced widgets, including
wx.ListBox, wx.html.HtmlWindow, and wx.ListCtrl.